2.1.7. Creating test files
Sometimes you need a test video or test image with a specific resolution, duration or framerate and specific content, e.g. gradient color, TV test image, counter or time code. Here are some useful commands and programs to create test videos and images.
A. Generate test video with ffmpeg
FFMPEG is a command line tool for handling (decode, encode, convert, …) video and audio files. It is used by many commercial and free software products, including Blender. The core is the FFMPEG program, together with a video & audio player (FFPLAY) and a stream analyzer (FFPROBE).
You can create a test video with the virtual input device lavfi. Because it’s a virtual device, you need to specify the force (-f) option.
The video source can be chosen from a variety of options; see ffmpeg documentation under section 14.9: allrgb, allyuv, color, haldclutsrc, nullsrc, pal75bars, pal100bars, rgbtestsrc, smptebars, smptehdbars, testsrc, testsrc2, yuvtestsrc.
With testsrc for example you can generate a test video pattern, showing a color pattern, a scrolling gradient and a timestamp.
You can first try out the command with ffplay to preview the output.
ffplay -f lavfi -i testsrc=duration=10:size=1280x720:rate=30
Figure 1: Output from FFMPEG command (see above)
If you are satisfied with the result, replace the ffplay command with ffmpeg and add the output file; eg test.mp4
ffmpeg -f lavfi -i testsrc=duration=10:size=1280x720:rate=30 test.mp4
More commands and test formats can be found at bogotobogo.
B. Generate a timecode overlay with FFMPEG
Did you ever needed a video with the timecode embedded?
ffplay -i test.mp4 -vf "drawtext=text='timestamp: %{pts \: hms}': x=500: y=500: fontsize=32:fontcolor=yellow@0.9: box=1: boxcolor=black@0.6"
This command will invoke the ffmpeg video player (ffplay). The input video is test.mp4. With the drawtext video filter, the timestamp is overlaid on the input video. The time format is specified with the pts parameter.
Replace the ffplay*command with *ffmpeg and add a output file to create a new video.
A more extensive introduction to the drawtext filter and the above mentioned ffmpeg command is given by Krishna Rao.
C. Generate a timecode overlay with Blender Python
The ffmpeg command above does the job but is not very flexible. With the following Python script of Tin2Tin, you can generate a timecode overlay very easily in Blender.
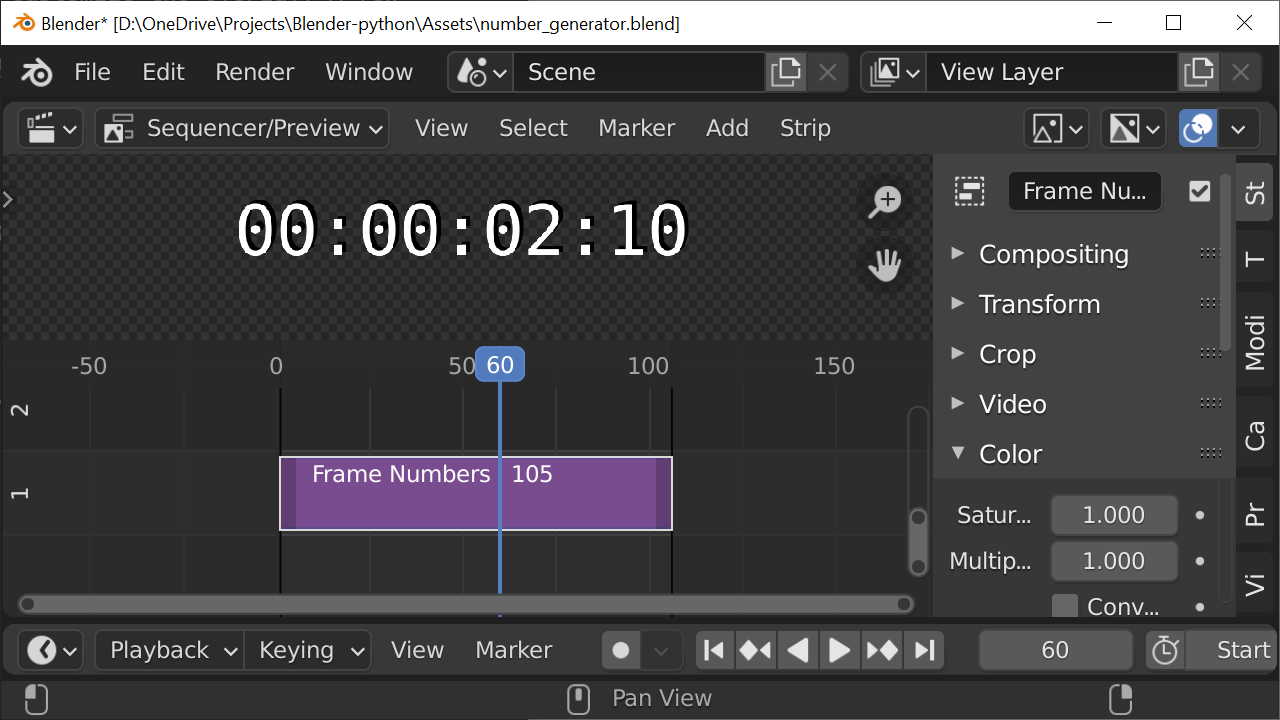
Figure 2: Test file generated from Python script
To create the time code overlay, follow the next steps.
Open Blender, set the render parameters (resolution, frame rate, start and frame). The length of the created time code overlay is determined by the Start and End field in the Render panel.
Switch to the scripting workspace, create a new text file and copy the downloaded code into the script editor.
Run the code with the menu Text > Run Script or Alt + P.
If you need this overlay for an existing video, you’ll have to render it out.
If you want to customize the script, the time code text is assembled at line 53:
text_strip.text = str(bpy.utils.smpte_from_frame(i))
The variable i stands for the frame number (Start <= i <= End). This value is converted to a time code with the smpte_from_frame function. This function creates a text from the frame number with the format of HH:MM:SS:FF and follows hereby the standard of the Society of Motion Picture and Television Engineers (SMPTE). The text is positioned at 0.8 on the Y-axis (near the top of the window).
The magic of the script occurs between lines 37 - 60, which is essentially a loop of the variable i between Start and End of the project. For each value of i, a text strip is created (44-49) of exactly one frame; from i to i+1 (38-42). The text property of that strip is then filled in and the strip is added to a list added_strips (31 and 60). At the end of this loop, all created text strips are grouped together into one meta strip (62-66). You can see the individual text strips if you tab into the meta strip.
This script gives you a lot of flexibility to customize the overlay. A few examples:
The overlay text should also contain the frame number.
text_strip.text = "Frame: " + str(i) + " - Time: " + str(bpy.utils.smpte_from_frame(i))
The overlay text should be in the middle of the preview window
text_strip.location[1] = 0.5
A timecode should only be generated every 10 frames. (Use the modulo-operator (%) for this).
if (i % 10)  != 0:
    text_strip.text = ""
else:
    text_strip.text = str(bpy.utils.smpte_from_frame(i))
And, of course, the blender VSE could also be used, for example by adding a color strip for the background color.
Another approach, suggested by Garrett, is to create a 3D-text object and animate the content, based on the current frame.
import bpy

scene = bpy.context.scene
obj = scene.objects['Text']

def recalculate_text(scene):
    time_code = str(bpy.utils.smpte_from_frame(scene.frame_current))
    obj.data.body = 'Current time: ' + str(time_code)

bpy.app.handlers.frame_change_pre.append(recalculate_text)
Switch to the Layout workspace and add a text object. Customize the text object in terms of font, size, position, … to your liking.
Give your text object a name. The code above assumes the standard name “Text”.
Switch to the scripting workspace, create a new text file and copy the code from above into the script editor.
Run the code with the menu Text > Run Script or Alt + P.
Switch back to the Layout workspace and move the play head. You will see that the text content is changed to something as “Current time: 00:00:00:12” depending on the position of the play head.
Make a test render. Change the camera position if needed.
If you need this clip in the Video Sequence Editor (VSE): create a new scene. Switch to the new scene and add a scene strip (Shift + A > Scene).
Attention: this scene strip will always start at time 0, no matter where you position the strip in the VSE. This could be handy, if for example, you want to show the time code relative to a specific strip.
D. Placeholder image generators
An image placeholder is a dummy image. There are several websites that can either provide you with the link to these images or give you the possibility to generate these images yourself on your computer. Of course, you can always save the online images behind the link.
For example, the URL http://via.placeholder.com/640x360 or https://placekitten.com/640/360 will show you a placeholder image of 640x360 pixels in the browser, which you can save to your computer.
Figure 3: Test file from via.placeholder.com
Figure 4: Test file from placekitten.com
These placeholder images are mostly used in website design to create mockups of webpages (together with Lorem Ipsum generators for text). Search in Google for “image placeholder” to find other websites or generators.
E. Blender Open-Movies
The WebM-format of the Spring open-movie can be downloaded from Wikimedia Commons.
F. Useful websites
https://www.demolandia.net/: Demolandia is, essentially, an audiovisual library where you will find a great diversity of images, audio and video files (e.g. 4K) related to the cinema.
https://file-examples.com/: This website is a service designed for developers, designers, testers. Various categories: video, audio, documents, images, …