2.1.6. Project settings
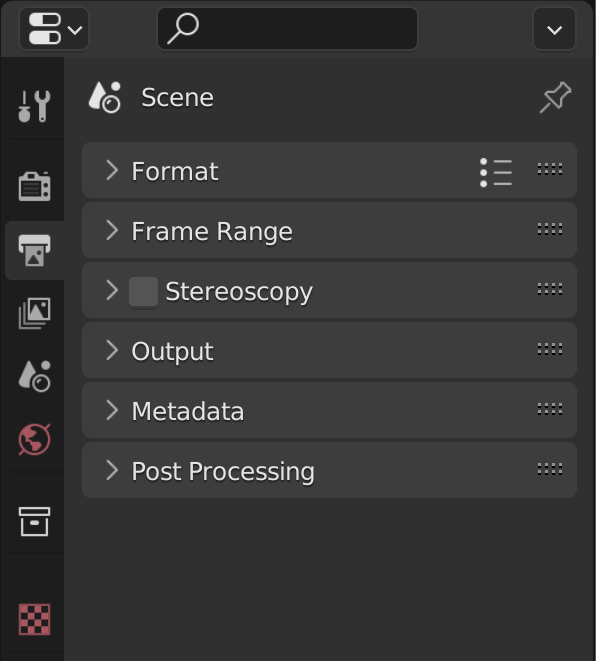
Figure 0: Output panels
The Project Settings for your video project are grouped in the Output Properties tab of the Properties Editor. This editor is located at the top right area in the default Video Editing workspace and is shared with the other modules, e.g. 3D modeling. The Properties has several categories, which can be chosen via tabs (the icons column to its left). Each tab regroups properties and settings of a data type. For the VSE, only the Output properties are commonly used. This tab is selected by default on opening the Video Editor Workspace. It contains 6 categories (panels): Format, Frame Range, Stereoscopy, Output, Metadata, & Post Processing.
Reference
Name: |
Dimensions |
Context: |
Video Sequence Editor > Properties |
Location: |
Tabs > Output Properties > Format |
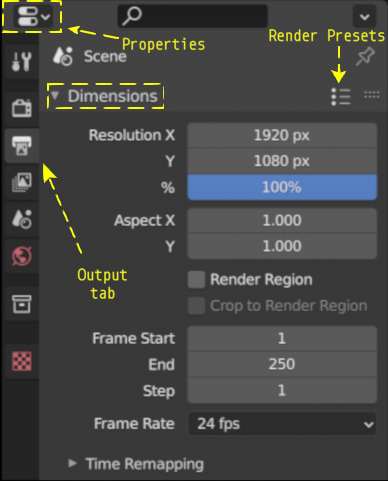
Figure 1: Dimensions panel
- Resolution
The resolution X and Y refer to the number of pixels in the horizontal and vertical axis of the output video. Common video resolutions are:
High Definition (HD) or 720p (1280 x 720)
Full HD or 1080p (1920 x 1080)
Ultra HD (UHD) 4K or 2160p (3840 x 2160).
Figure 2 shows these three common resolutions more visually. Note how small the HD resolution is, compared to the UHD or 4K version. Of course, there are many more formats for social media, film theater, …. A rather exhaustive list can be found at Wikipedia.

Figure 2: Ultra HD, FHD and HD resolution
With the Render Presets button (see figure 1), you can choose between common video render settings (HDTV 1080p, HDTV720p, …). The resolution, resolution %, the aspect ratio and the fps will be set accordingly. You can also create your own preset: change the settings in the Dimensions panel to your liking, enter a name in the New Preset field and press the + button. The Presets are stored in the scripts/presets/render directory as a Python file.
- Resolution %
You can set the Resolution % (default = 100%) to a lower percentage to render the video temporarily in a lower resolution. For example, if set to 10%, a full HD movie will then render at the resolution of 192 x 108 pixels. You can check this by RMB + Click & hold at the top right corner of the preview of the Video Sequencer. In the status bar, you will notice something like:
X : 190 Y: 100 ..., meaning that the location you clicked is at resolution X = 190 and resolution Y = 100. So the full render image is effectively 192 x 108 pixels. Of course, the picture will look terrible; you only have 192 x 108 = 20736 pixels at your disposal to draw the picture.Figures 3 - 4 show the render result with the percentage set to 10% and 5% of the 4K image of figure 2. Please note, that a 10% render of the UHD image still gives us an image of 386 x 216 pixels. The images are scaled up to have a clear view and the same dimensions of figure 2. Figure 4 is in reality only 192 pixels wide x 108 pixels tall.
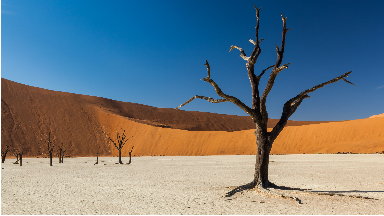
Figure 3: Figure 2 rendered at 10%
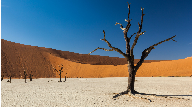
Figure 4: Figure 2 rendered at 5%
Lowering the resolution % is not meant to speed up the preview or the scrubbing of the timeline. For that, you need proxies. Because proxies are enabled by default (see Edit > Preferences > System Video Sequencer > Proxy Setup), you will not notice much improvement in navigating the timeline with a small resolution %. Only the render time is affected. You can use this option if you want to create a quick test render, for example to check the audio synchronization of your video.
- Aspect X/Y
We tend to view the pixels of our computer display as little squares and for most modern computers, they are in fact squares. In the world of cinema and television, especially with older equipment, non-square pixels are commonplace. All movies on DVD and BluRay for example use rectangular pixels. Shooting with anamorphic lenses also gives a distorted raw image on a computer screen, due to the use of non-square pixels.
Figure 5 shows an example of a raw image, taken with an anamorphic lens with a horizontal compression of 1.33. Anamorphic lenses are typically used in cinema to achieve an ultra wide screen view. To achieve this, the image is horizontally squeezed. Although perhaps not immediately that obvious, figure 5 looks a little bit distorted.
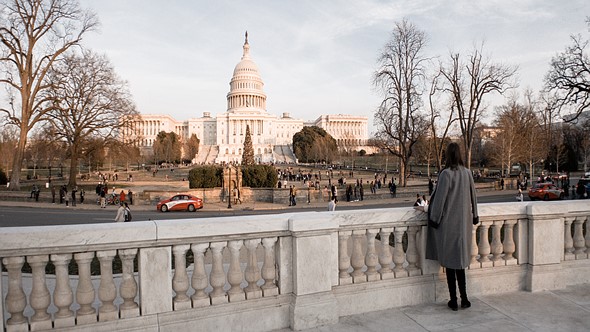
Figure 5: Raw image from an anamorphic lens
With ffmpeg, you can retrieve the aspect ratio of this image. The result is:
590x332 [SAR 96:96 DAR 295:166]According to ffmpeg, the image is 590 x 332 pixels (so does Blender)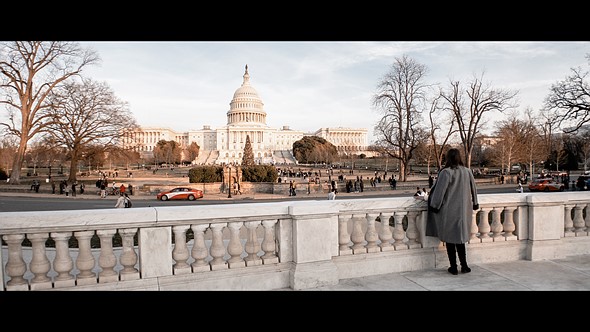
Figure 5: Post-processed image from an anamorphic lens
This can give all sort of problems when you want to play an old DVD movie on your computer. Sometimes, the characters are squeezed or stretched. Why? And what can you do about it?
Todo
Describe in more detail and use example of anamorphic lens. For some examples, see The Pixel Aspect Ratio Acid Test: http://frs.badcoffee.info/PAR_AcidTest/ and https://ia800900.us.archive.org/11/items/TvTestCard/TvTestCard_512kb.mp4 and https://www.dpreview.com/articles/5787493634/shooting-photos-with-anamorphic-lenses-is-a-fun-way-to-get-out-of-a-creative-rut
- RenderRegion/Crop to Render Region
These options cannot be used in the VSE and, if set, will result in an error message
Border rendering is not supported by sequencer.- Frame Rate
The number of frames that are displayed per second. The drop-down menu gives several common frame rates (23.98, 24, 25, 29.97, 30, …). These presets refer to the different standards: NTSC (30 fps, mostly in North-America) and PAL/SECAM (25 fps, mostly Europe) and the necessary adjustments made in the 1950’s to adapt to color TV (23.98 and 29.97). Other frame rates can be used by selecting Custom. You can enter then a FPS and base number. The custom framerate is the result of:
FPS / base number. For example, to simulate a 25 fps preset, you can enter FPS = 25 and base = 1 or FPS = 50 and base = 2.When the first video strip is added to the sequencer, the frame rate of the project is automatically set to the frame rate of that strip. Adding a second strip with a different frame rate -even if the first strip is deleted- will not change that setting. Blender VSE cannot handle different frame rates in one project. You will not get a warning, besides some odd-looking audio strips and slow or fast motion effects.
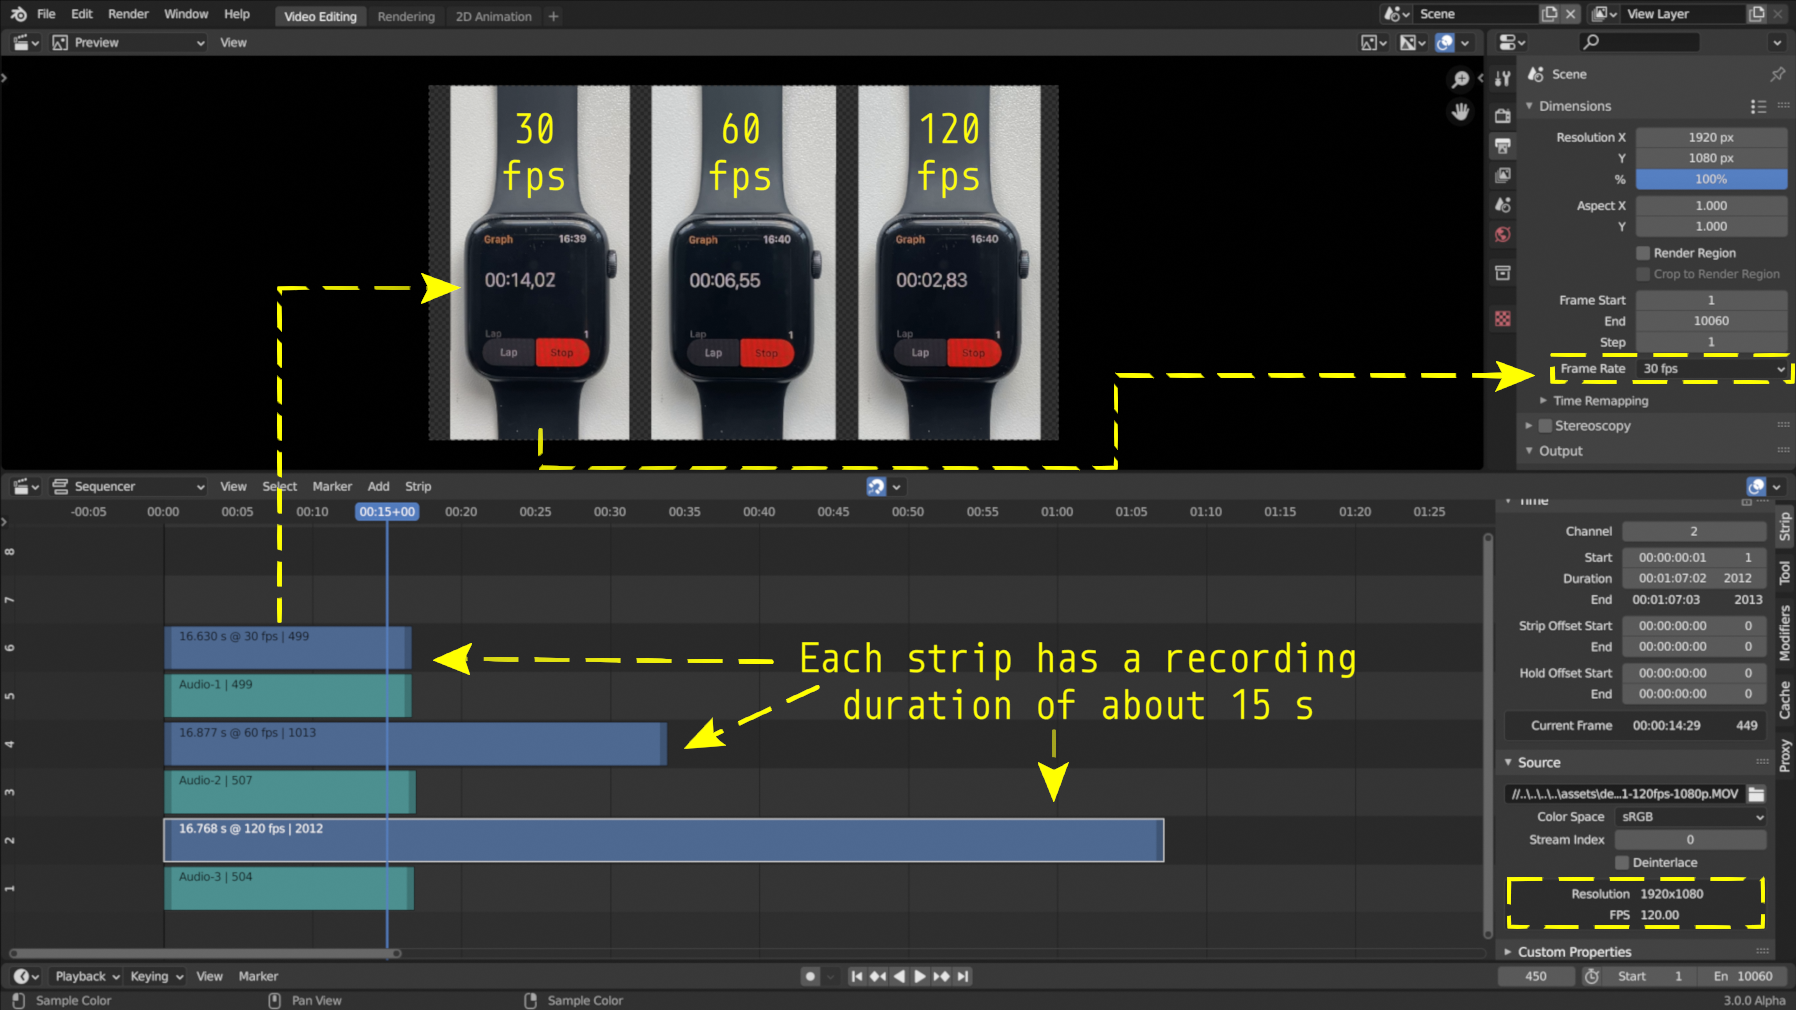
Figure 6: Mixing of different frame rates in one project
Figure 6 contains 3 strips that were recorded at different frame rates. Their capture frame rate was respectively 30 fps, 60 fps and 120 fps. Each recording took about 15 seconds. The strip with fps = 30 was first added. This has set the presentation frame rate of the entire project to 30 fps. Later on, strips of 60 fps and 120 fps were added. This does not change the project presentation frame rate, but, of course, the capture frame rate of the strips remains unchanged.
All the audio strips have a duration of about 15 seconds because the audio is independent of the presentation frame rate. The movie strip with capture fps = 30 has also a duration of about 15 seconds. This is because the capture and presentation frame rate is equal. The strips with capture frame rate of 60 and 120 fps are much longer. The image of the watch in the preview shows that after about 15 seconds (first watch), only 6.55 and 2.83 s are passed on the second and third watch. This is because the second strip (60 fps) contains 16.877 s x 60 fps = 1012.62 (captured) frames that were presented at a framerate of 30 fps, which takes about 33.754 s. The real time on the watch is about 6.55 s. With a capture frame rate of 60 fps, this represents the image of frame 393. Again, frame 393 will be presented at time 13.1 s with a presentation frame rate of 30 fps. This is approximately the time you can see on the first watch (allow some differences due to different starting times). If these were real animation movies, you would see a slow-motion effect with strip 60 fps and even more with strip 120 fps.
So, it’s important to set the presentation frame rate equal to the capture frame rate of the strips. You can find the capture frame rate of a strip in the Properties > Source > FPS.
Note
The determination of the capture frame rate of video can sometimes be a rabbit hole. Most devices (in particular smart phones) do not mention that they capture in Variable Frame Rate mode. So, when setting the capture frame rate to 30 FPS, in reality, the frame rate can vary between 29 fps and 31 fps. This has no repercussion for the Start and End of the strip but it can cause (small) problems with the synchronization of video and audio.
In the section Extra Tools, we have provided a solution to convert a video from variable rate to fixed and to change the FPS.
Reference
Name: |
Dimensions |
Context: |
Video Sequence Editor > Properties |
Location: |
Tabs > Output Properties > Frame range |
- Frame Start/End/Step
The sequencer timeline can contain multiple strips, spread over over several hundreds of frames. You don’t need to render all these frames. With the Start and End fields, you can limit the output range.
- Step
Controls the number of frames to advance by for each frame in the timeline. If the strip in the Sequencer contains 10 frames, then a step of 2 will render 5 frames (frames 1,3,5,7,9).
- Time Stretching
You can use this to speed up or slow down the playback of the whole project. For example, in figure 7, there are two indicators of the Current Frame. The Playhead is split into a blue line (the old frame number) and a blue box with the new frame number (which you actually see in the preview).
- Old
The length in frames of the original animation.
- New
The length in frames of the new animation.
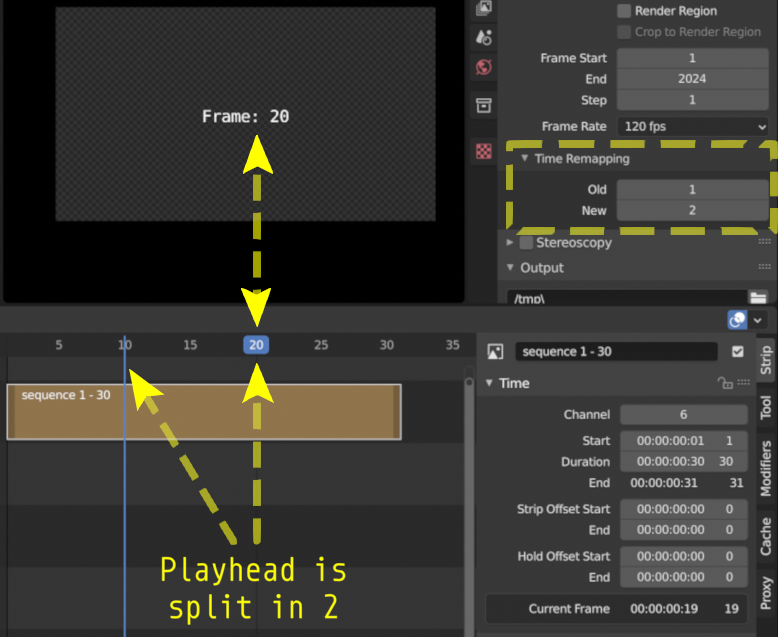
Figure 7: Time Remapping (Old:1, New:2)
Reference
Name: |
Stereoscopy |
Context: |
Video Sequence Editor > Properties |
Location: |
Tabs > Output Properties > Stereoscopy |
Stereoscopy is a technique to create the illusion of three-dimensional depth from a pair of two-dimensional images. These images resemble the way our left and right eye would perceive the real image. In Blender, it is very easy to create stereoscopic images or movies; just enable the option in Output Properties > Stereoscopy > Stereo 3D. For more information; see Stereoscopy in the Blender manual.
Editing a stereoscopic movie in the Blender VSE is a two-step process:
Enable the Stereoscopy option under output Properties > Stereoscopy > Stereo 3D. This will also add a new panel in the Source properties.
Select the stereoscopic strip and enable the Use Multi-View option in the Source panel of the movie strip. This option is only available after you have completed step 1. Choose the appropriate Views Format. This depends on the format of the source file. If the image pair is saved as two individual files; select Individual. If the image pair is saved as one file, with both images side-by-side, select Stereo 3D and set the Stereo Mode to Side-by-Side.
Reference
Name: |
Output |
Context: |
Video Sequence Editor > Properties |
Location: |
Tabs > Output Properties > Output |
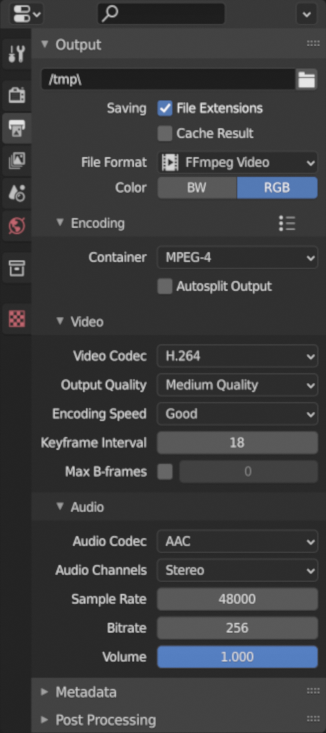
Figure 8: Render output properties
Figure 8 shows the expanded Output panel of the Output properties. Here you define the location and file format of your rendered project. In figure 8, the FFmpeg Video File Format is selected. The other possible file formats are shown in figure 9.
- Output Path
In the previous section, we described a possible directory structure to hold all files that are related to your video project. In this structure, the rendered output could be stored in 3-2-Render. Because the Blend-file is stored at 3-1-Blend-file, the Output File Path should be
//../3-2-render/. The first // is the Blender-notation for the directory containing the current Blend-file. Depending on your choices about the File Format, you can add a file name or a directory name. The File Path//../3-2-render/myProject-v01.mp4will create a file myProject-v01.mp4 in the specified directory (3-2-render). If you omit the extension (e.g.//../3-2-render/myProject-v01) and enable Saving File Extensions , then a file myProject-v010001-0020.mp4 is generated for a 20 frames project. If you render an image sequence, it is best to specify a subdirectory; place a / at the end as in//../3-2-render/myProject-v01/. Rendering the project will then create the files 0001.png, 0002.png, 0003.png, … in the folder 3-2-render/myProject-v01.- Saving File Extensions
Enabling this option will add the appropriate file extension to the file name (see figure 9 for the possible file formats).
- Cache result
Enabling tis option will save the render Cache to EXR files. This is useful for heavy compositing but it affects indirectly the rendered scenes.
- Color
Choose BW for saving grayscale images, RGB for saving color images (red, green and blue channels), and RGBA for saving color images with transparency enabled (red, green, blue and alpha channels). The RGBA option is only available with certain file formats (see below). For example, the JPG file format does not have an alpha channel, while the PNG format does. Also, most video file formats don’t have a transparency option.
- File Format
You can render the sequencer content as as series of images (BMP, Iris, PNG, …, TIFF; see figure 9) or as a movie which is, of course, also an embedded series of images.
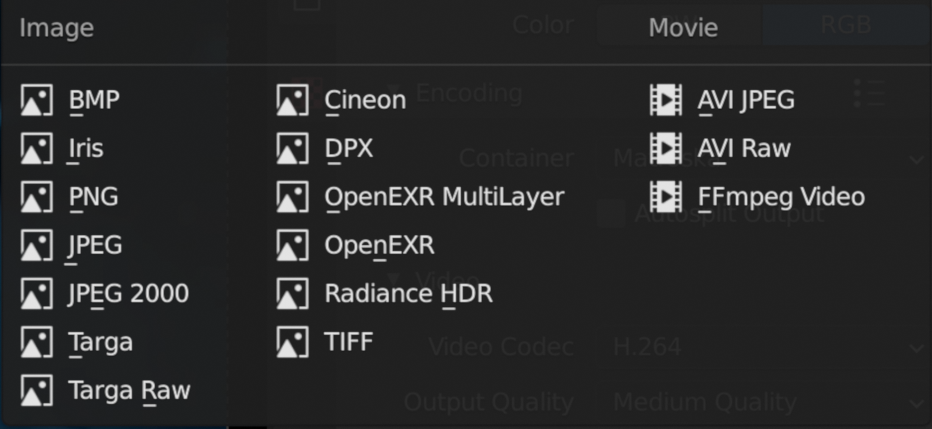
Figure 9: File formats
Which one should you choose? Depending on your choice, several additional fields are added in the sidebar. All possible Image and Movie formats are described in detail in the section Output of the docs with an overview of all Video & Audio Formats and graphics formats (see figure 9 for a list).
Warning
It’s important to keep in mind that Blender is foremost a 3D and 2D modeling and animation program. Artwork is mostly created and rendered from within the 3D View or Grease Pencil workspace. As an artist, you have full control on resolution, composition, speed, color, …. As a video editor, however, you usually work with existing material from camera output; where many parameters are already fixed. The Output settings therefore are for a great deal dictated by the imported footage.
If you are in the Video Editing Workspace, the default is set to a FFmpeg Video with H.264 as default video codec and AAC as audio codec. Other workspaces set the default to PNG Image Sequence and the Blender docs and many tutorials favor this approach. It’s easier to stop & restart the render process (for example, in case of a crash or when you need your computer for something else). You can choose a high-quality, lossless format (e.g. OpenEXR) that’s ideal for post-processing such as color grading or VFX. You can use a render farm, … These advantages, however, are much more obvious in a 3D-animation creation process (which is the main focus of Blender), where you have full-control over the image quality. It is less obvious in a video editing workflow, where the quality of the source material is usually fixed; e.g. your footage is already shot and for example, creating a openEXR image sequence from H.264 footage will not increase the quality of it. If you saved your project as an image sequence, you also need to save the audio separately. And, in the end, you probably will need a single movie-file to hand over to your client. So, in a typical video editing workflow a single movie file format (FFMpeg Video) is much more common.
Note
A 1080P video with 30 fps and 10 seconds duration has an uncompressed file size of 1080 x 1920 (dimension) x 3 (color channels) x 30 (fps) x 10 (duration) = 1.866.240.000 bytes or 1.73 GB. In most cases, this file is too big and should be compressed with for example, the H.264 codec. This codec can yield compression ratios from 1:50 to about 1:200 (200 bytes are compressed into 1 byte), reducing the above file size to about 36 MB - 9 MB. The following concepts are important to keep in mind:
intraframe compression: instead of coding every pixel of a frame, only the differences between pixels are encoded. For example, for a completely black frame you need only to encode the color and the info that it applies to the whole frame (or to certain blocks, …).
interframe compression: the frames in an image sequence are not all completely different. So, in theory, it’s sufficient to encode the first frame (called a key frame or I-frame) and from then on only the differences. This could work very well in a play-forward stream. In a typical video editing environment (with scrubbing, play backwards, jumping) however, this is a bad compression technique. To move one frame backwards, you have to process all the previous frames until the last keyframe. The term GOP (Group of Pictures) refers to the number of frames that are connected to one keyframe. The bigger the GOP size, the more compression but also the more processing needed to edit.
Lossy compression: the result of the compression is that some information is deleted from the file. Most of the time, this is not or hardly noticeable with the human eye. The JPEG image format is a lossy file format. WEBM/VP9 and Theora are lossy video codes. AAC is a lossy audio codec.
Lossless compression: the compressed file -although smaller- contains exact the same information as the uncompressed one. It is possible to reconstruct the original image from the lossless compressed file. The PNG image format is a lossless file format. FFmpeg video codec #1 and HuffYUV are lossless video codecs. FLAC is a lossless audio codec.
Some codecs have a lossy and lossless variant (for example DNxHD, H.264). Wikipedia maintains an extensive list of lossy and lossless video and audio codecs .
- AVI JPEG
In the first two choices of figure 9 (AVI JPEG and AVI Raw), the term AVI (Audio Video Interleaved) refers to the container: a file format developed by Microsoft in 1992. AVI JPEG uses the Motion JPEG (M-JPEG or MJPEG) codec in which each video frame is compressed separately as a JPEG image. So, this codec uses only intraframe compression and is thus very well suited for video editing purposes but also results in a bigger file size (because it’s only intraframe compression). It is also a lossy compression because it uses the JPEG codec. Audio is not embedded in the container and should be exported separately.
- AVI Raw
AVI Raw doesn’t use a codec as such and stores the raw images into the AVI-container. The file size is thus much greater but the quality and processing speed (besides the bigger frame size) are better. Audio is also not embedded. For a comparison, the original Spring Open movie (container: MPEG-4, video codec: AVC (Advanced Video Codec), Audio codec: AAC LC (Advanced Audio Codec Low Complexity) has a file size of 29.6 MB. The AVI Raw has a file size of 64.5 GB, the AVI JPEG has a file size of 1.87 GB; both without audio.
Note
Due to this huge file size and the absence of audio, both formats should probably not be used as delivery format but as fallback.
- FFmpeg video file format
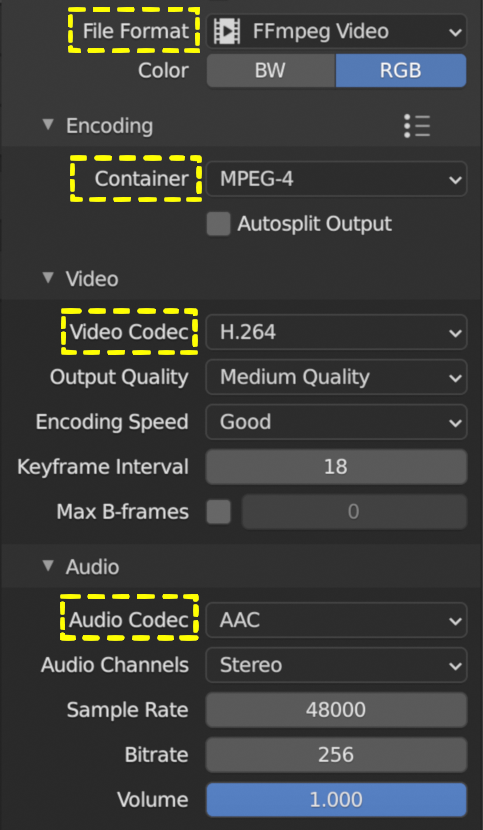
Figure 10: FFmpeg Video settings
FFmpeg video is an umbrella term for several containers and codecs. It uses the ffmpeg libraries under the hood to create the video file. When selecting this option, several presets are available:
DVD,H264 in Matroska,H264 in Matroska for scrubbing,H264 in MP4,Ogg Theora,WebM (VP9+Opus), andXvid. Selecting one of these presets will set the encoding, video and audio options below to a pre-defined value. We describe only the very popular H264 in MP4 and the related concepts. These are also applicable to the other presets.- Encoding
Selecting the FFmpeg Video File Format will add the Encoding, Video, and Audio section to the side panel. A distinction should be made between the concepts container and codec. For example, in figure 10, the container is MPEG-4 (with file extension mp4), the Video Codec is H.264 and the Audio Codec is AAC. A container “contains” the various components of a video: the stream of images, the sound, subtitles, metadata. A codec is software or hardware that compresses and decompresses digital video or audio.
- Container
A container specifies how the data (audio, video, subtitles, …) is stored in the video file, and how transporting and presenting this info can be organized. You can recognize the container through the file extension (.mp4, .mov, …). This is not a waterproof method however. For example, you can easily change the file extension from .mp4 to .mov or .avi and still be able to view the video with most players. To detect the container signature (within the file), you need extra-software such as FFprobe or MediaInfo (see Extratools).
The available container file formats are:
MPEG-1,MPEG-2,MPEG-4,AVI,Quicktime,DV,Ogg,Matroska,Flash, andWebM.A container can be tied to a specific codec. For example, the
MPEG-1``and ``MPEG-2containers enforce the video codec (you cannot choose one), so that you can only define quality parameters, and the audio codec. For theMPEG-1container the only valid audio codecs are AC3, MP2, and MP3; although all audio codecs are available. You can select the AC3 audio codec without any render error but the sound however is not stored. And, if the MP2 audio codec is selected, then the Bitrate must be less than 128 bps. Another example: the webM and Ogg file format can only contain a Vorbis and Opus codec.Note
If you combine incompatible codecs or containers, the Render Animation command will show an (easy to miss) error message in the statusbar such as
Could not initialize streams, probably unsupported codec combination. However, a non-playable output file is yet produced.Wikipedia has a very extensive documentation on all available container formats with an overview table of the valid container-codec combinations. A very good YouTube tutorial about the difference between container and codec is Explaining Digital Video: Formats, Codecs & Containers
- Autosplit
If the output file is bigger than 2 GB, you can Autosplit the output in chunks of max. 2 GB. Each chunk can be played separately.
- Video
- Video Codec
The name CODEC stands for Compressor/Decompressor (sometimes also referred to as coding/decoding). It is the software that compresses the file (see above). Available options are:
No Video,DNxHD,DV,FFmpeg video codec #1,Flash Video,H.264,HuffYUV,MPEG-1,MPEG-2,MPEG-4 (divx),PNG,QT rle/QT Animation,Theora, andWEBM/VP9.The goal of (lossy) video encoding is to reduce the file size of the original input file, while retaining as much quality as possible. So, there is a tradeoff between size and quality.
Depending on the selected video codec, some of the fields below are not displayed. For example, if you select the No Video codec, no additional fields are shown.
Warning
The description below is based on the popular H.264 video codec. Blender has opted to hide some of the complexity of this codec. Other codecs require that you explicitly specify all necessary attributes. In the text we will refer to those implicit settings.
- Output quality
The default is set to Medium Quality. The image quality of a video is dependent of the bitrate; i.e. the number of bits used per unit time. Setting a high bitrate will result in a higher quality because you have more bits per unit time to dislay the image.
With FFmpeg, you can use a constant bitrate or settle with one of the predefined Quality levels. With a constant bitrate the number of bits per unit of time is always the same, no matter how complex the image stream is. A variable bitrate can adapt to the complexity of the stream and use a lower bitrate with for example a motionless video. A variable bitrate is automatically set if you select one of the predefined quality levels.
- Quality levels (variable bitrate)
You need to give some indication about the desired quality of the output; otherwise the codec could always settle for the lowest bitrate, which is of course also the lowest quality.
Blender has opted to use verbal labels; which are a translation of FFmpeg’s Constant Rate Factor (CRF): a value between 0 and 51, where lower values would result in better quality (more bits per frame), at the expense of higher file sizes. Higher values mean more compression, but at some time you will notice the quality degradation. A change of ± 6 should result in about half/double the file size.
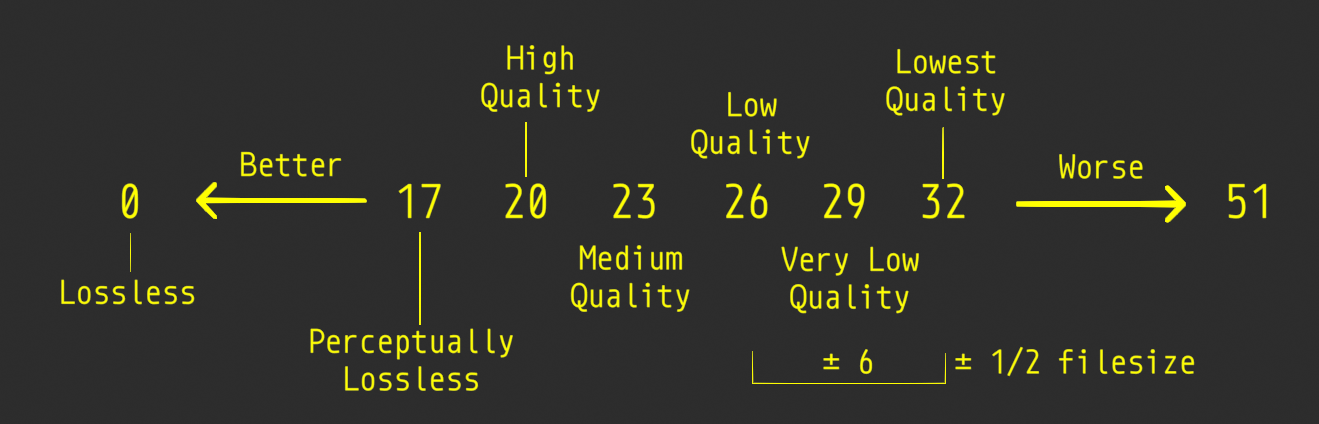
Figure 10: Output Quality and FFmpeg’s Constant Rate Factor (CRF) values
- Constant Bitrate
In FFmpeg, there is no native or true CBR mode, but Blender “simulates” a constant bit rate setting by tuning the parameters of a one-pass average bitrate encode. You need to set the following, additional input fields. However, Bitrate, Minimum, and Maximum can all be set to the same value.
- Bitrate
Bitrate is the amount of data encoded for a unit of time. For streaming, it is usually expressed in megabits per second (Mbps) for video, and in kilobits per second (kbps) for audio. The default is set to 6000 bps. As a comparison, the recommended video bitrate for YouTube uploads is set to 8 Mbps for 1080p and 5 Mbps for 720p.
- Minimum
Although the Constant Bitrate option is selected, the encoder will fluctuate around this number. You can set a minimum.
- Maximum
However, the maximum is probably more important. If you suspect that your viewer has limited bandwidth, you can specify this maximum. The encoder will never encode in a higher bitrate.
- Buffer
This is the “rate control buffer”, so it will enforce your requested “average” (the value you set with Bitrate) over the buffer window. It is assumed that the receiver / player will buffer that much data, meaning that a fluctuation within that range is acceptable. The default is set to 1792 bits.
- Mux Rate
Multiplexing is the process of combining separate video and audio streams into a single file, similar to packing a video file and .mp3 audio file in a zip-file. The value of Mux Rate is the maximum bit rate of the multiplexed stream. The default is set to 10080000.
- Mux Packet size
Default: 2048. Reduces data fragmentation or muxer overhead depending on the source. The default is set to 2048.
- Encoding speed
Presets to change between a fast encode (bigger file size) and more compression (smaller file size). The available options: Slowest, Good, Realtime
- Keyframe Interval
The number of pictures per Group of Pictures. The default value is 18. Set to 0 for “intraframe only” compressing, which disables inter-frame video compression. A higher number generally leads to a smaller file but needs a higher-powered device to replay it.
The value of the Keyframe Interval depends on your goal. If you want to use this outputed video for further editing, then a small interval is better. To recreate a non-keyframe, you need to find the associated keyframe and apply all differences in between. If all frames are keyframes, then each frame can be recreated on its own; but, of course, the compression is minimal and the file size will be larger.
- Max B-frames
B-frames are bi-directional frames. They use both previous and forward frames for data reference to get the highest amount of compression. The value is the maximum number of B‑frames between non-B-frames. Again, a small value will be beneficial for a video that needs to be edited.
- Audio
Only certain audio codecs will be able to fit in your target output file; see Guidelines for high quality lossy audio encoding for an overview table.
According to the FFmpeg docs, the quality of the available audio encoders could be ranked as folllows: Opus > Vorbis >= AAC > MP3 >= AC3 > aac > libtwolame > vorbis > mp2 > wmav2/wmav1
- Audio Codec
Available options:
No Audio,AAC,AC3,FLAC,MP2,MP3,Opus,PCM, andVorbis. Advanced Audio Coding (AAC) is the successor format to MP3 and defined in MPEG-4 part 3.- Audio channels
Available options: Mono, Stereo, 4 channels, 5.1 Surround, 7.1 Surround
- Sample Rate
The sample (sampling) rate is analogous to the frame rate or FPS (frames per second) measurement for videos. An analogue sound wave is measured or sampled at a regular interval and the result is stored in the audio stream/file. For audio, the minimum number of samples per second to unambiguously represent English speech is 8000 Hz or 8000 samples per second. Other common values are 44.100 Hz or 44.1kHz (music CD quality), and 48kHz (most common for audio tracks in movies). The default setting is 48000.
- Bit Rate
For each codec, you can control the bit rate (quality) of the sound in the movie. Higher bit rates are bigger files that stream worse but sound better. Use powers of 2 for compatibility.
For music, 64 (AAC)/96 (MP3) kbps is a good general-purpose setting that will sound good most listeners. This is the standard bitrate for podcasts, and it sounds great on most contemporary devices, including smart speakers and mobile devices. If bandwidth cost is a concern, you might consider using a lower setting. For enhanced listening, go higher.
As a rule of thumb, for audible transparency, use 64 kBit/s for each channel (so 128 kBit/s for stereo, 384 kBit/s for 5.1 surround sound) (see https://trac.ffmpeg.org/wiki/Encode/AAC )
For talk, 32 (AAC)/64 (MP3) kbps is a good standard setting for most purposes. If you are particularly budget conscious, you can use a lower setting for talk radio and few people will notice the difference.
The minimum is 32 and maximum is 384 kbps. The default is set at 192
- Volume
Slider: default at 1
Reference
Name: |
Output |
Context: |
Video Sequence Editor > Properties |
Location: |
Tabs > Output Properties > Metadata |
Todo
Describe metadata
Reference
Name: |
Output |
Context: |
Video Sequence Editor > Properties |
Location: |
Tabs > Output Properties > Post Processing |
The Post Processing panel is used to control different options used to process your image after camera rendering have taken place.
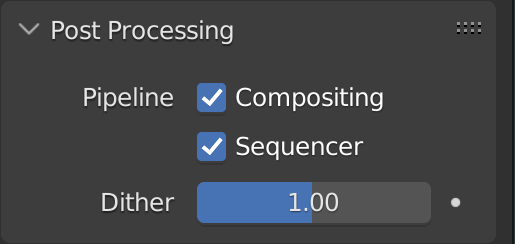
Figure 12: Post processing options
Compositing
The output of the render process comes from the the Composite Output node of the compositor. Note that this option should be enabled but also the Use Nodes option in the compositor. If both conditions are not fulfilled, then the output of the active camera is used to render the images.
Sequencer
Renders the output of the Video Sequence editor, instead of the active camera or Compositor. If the sequence contains Scene strips, these will also be rendered as part of the pipeline. If Compositing is enabled (but see above), the Scene strip will be the output of the Compositor.
If the Video Sequence Editor contains only audio strips, then the visual render output comes from the Composite Output node of the compositor or the active camera and the audio from the Sequencer.
If the Video Sequence Editor is empty, then the active camera or Composite Output node is rendered, even if the option Sequencer is enabled.
Dither
Dithering is a technique for blurring pixels to prevent banding that is seen in areas of gradients, where stair-stepping appears between colors. Banding artifacts are more noticeable when gradients are longer, or less steep. Dithering was developed for graphics with low bit depths, meaning they had a limited range of possible colors.
Dithering works by taking pixel values and comparing them with a threshold and neighboring pixels then does calculations to generate the appropriate color. Dithering creates the perceived effect of a larger color palette by creating a sort of visual color mixing. For example, if you take a grid and distribute red and yellow pixels evenly across it, the image would appear to be orange.
test Some useful links:
Discrete Cosine Transformation: https://www.youtube.com/watch?v=Q2aEzeMDHMA&t=33s
JPEG compression: https://www.youtube.com/watch?v=Ba89cI9eIg8
Video compression: https://www.youtube.com/watch?v=QoZ8pccsYo4
Rate Control mode: https://slhck.info/video/2017/03/01/rate-control.html