2.2.2.5. Speed
With the Speed Control strip, you can change the apparent speed of an action in a shot. In classic movies, this is done by inserting or skipping frames in the strip.

Figure 1: Speed control - basic concepts
The top strip in figure 1 contains a recording of a 0.5 second motion-trajectory of a red ball, recorded in camera with a frame rate of 24 frames per second (fps). You can create a copy of this strip with each frame duplicated. This will result in slow-motion (see bottom strip of figure 1) if you preview this strip with the same frame rate (24 fps). The apparent speed of the ball is halved because it takes now 0.5 s or 12 frames for the ball to travel half of the original trajectory. The mid strip illustrates a time lapse or speed-up. This is done by skipping each other frame in the preview. The trajectory is previewed in 0.25 s, whereas in the original strip half a second was needed. The ball seems to move twice as fast.
Note
The above mentioned method of slow-motion is not a real slow-motion (slow-mo). For that, you need different recording and presentation frame rates. When you shoot a video, your camera records the action with a certain frame rate; e.g. 24 or 30 images or frames per second. For a regular replay, your presentation frame rate (Blender’s project frame rate) need to be the same as the recording frame rate.
Suppose however, that the recording frame rate of your camera is 60 fps; so 1 second of actual movement is spread over 60 frames. But, you can import this clip into a Blender project that is set with a 30 fps frame rate. So, in Blender, it will take 2 seconds to play this clip of 60 frames. The movement in the clip seems to be slowed down (1 second of actual movement is spread over 2 seconds of display time). This is real slow-motion; each frame is a real tiny movement. The slo-mo in figure 1 is done by inserting duplicate frames; so only half of the movement in figure 1 is real. The other half never actually took place at that moment in time.
With the Speed Control strip, you can simulate the time lapse or slow motion effect from figure 1. To add a Speed Control strip, you have to select a regular Movie, Image Sequence or Meta strip (in figure 2, this is the Target strip). With the menu or Shft A you can add a Speed control strip (green bar in figure 2). This strip is put above the original target strip and cannot be moved below it (but it can be moved higher up). You can look at it as a modified copy of the target strip, so you can hide the original target strip.
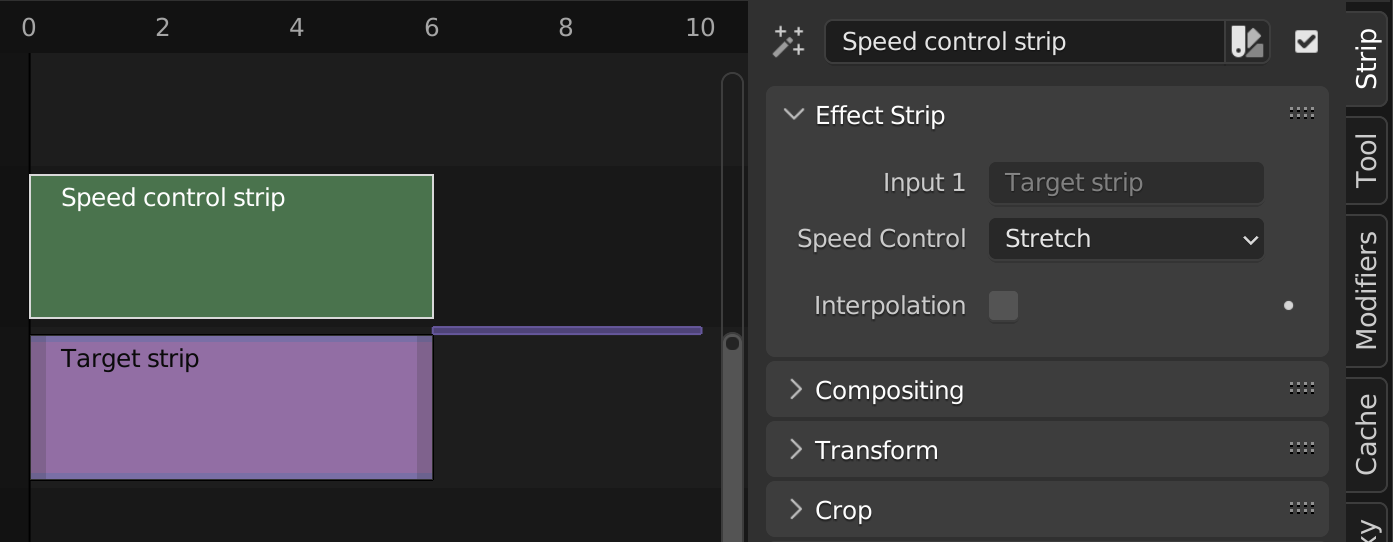
Figure 2: Speed control properties
2.2.2.5.1. Options
With the Speed Control strip, you can choose between four methods to create the speed effect: Stretch, Multiply, Frame Number, and Length.
- Stretch
The playback speed is determined by the relationship between the duration of the original target strip (purple strip + offset in fig 2) and its current visible duration (green strip in fig 2).
the Speed Control strip is shorter the the original target strip: ➽ time lapse or apparent speed-up
the Speed Control strip has the same length as the target strip: ➽ no apparent speed change.
the Speed Control strip is longer the the original target strip: ➽ slow-motion
Time lapse
In figure 3, the original target strip has a duration of 100 frames (frame 0 - 99 with values 0 - 99). Dragging the right strip handle to the left will shorten the strip by introducing a Strip Offset End. So, the visible strip and also the Speed Control strip count only 60 frames. The hidden frames of the target strip are marked with a small purple line and indicated with the Strip Offset End field in the side panel.

Figure 3: Speed Control - Stretch option with skipping frames
The Speed Control strip in figure 3 seems to play faster because it skips some frames from the original target strip (e.g. 2, 4, 7, …). The following frames are shown when playing the Speed Control strip in figure 3.
0 1 3 5 6 8 10 11 13 15 16 18 20 21 23 25 26 28 30 31 33 35 36 38 40 41 43 45 46 48 50 51 53 55 56 58 60 61 63 65 66 68 70 71 73 75 76 78 80 81 83 85 86 88 90 91 93 95 96 98
The original target strip of 100 frames is squeezed (stretched) into a playback strip of 60 frames. So, several frames are skipped and it seems to play faster.
Which frames are skipped and which are displayed? The following formula is used:
Speed[i] = Target[(i/speed length) * target length] (1)In figure 3, frame 25 of the Speed Control strip gets the value of frame (25/60) * 100 = 41.67 or (rounded down) frame 41 of the target strip (left panel). In the right panel, frame 45 from the Speed control strip is selected and the preview shows the normally hidden frame (45/60) + 100 = 75 from the target strip.
What will happen if you shorten the original target strip even more, for example up to two frames. The first frame of the Speed Control will again contain the value of 0 because 0/2 * 100 = 0 or the first frame in the target strip. The second frame of the Speed Control contains the value of 50 because 1/2 * 100 = frame 50 which contains the value “50”. You could argue that if you want to speed up a 100 frame strip to only two frames, you should choose the first and last frame, in stead of the first and mid one.
Slow motion
You can also increase the visual duration of the original strip by dragging the right handle to the right or increasing the Duration field. In figure 4, the Duration is set to 200 frames. This will introduce a Still Offset End (see Time panel Movie strip); represented by a blueish purple. Because the Speed Control strip is longer than the original target strip, a slow-motion effect should be the result.
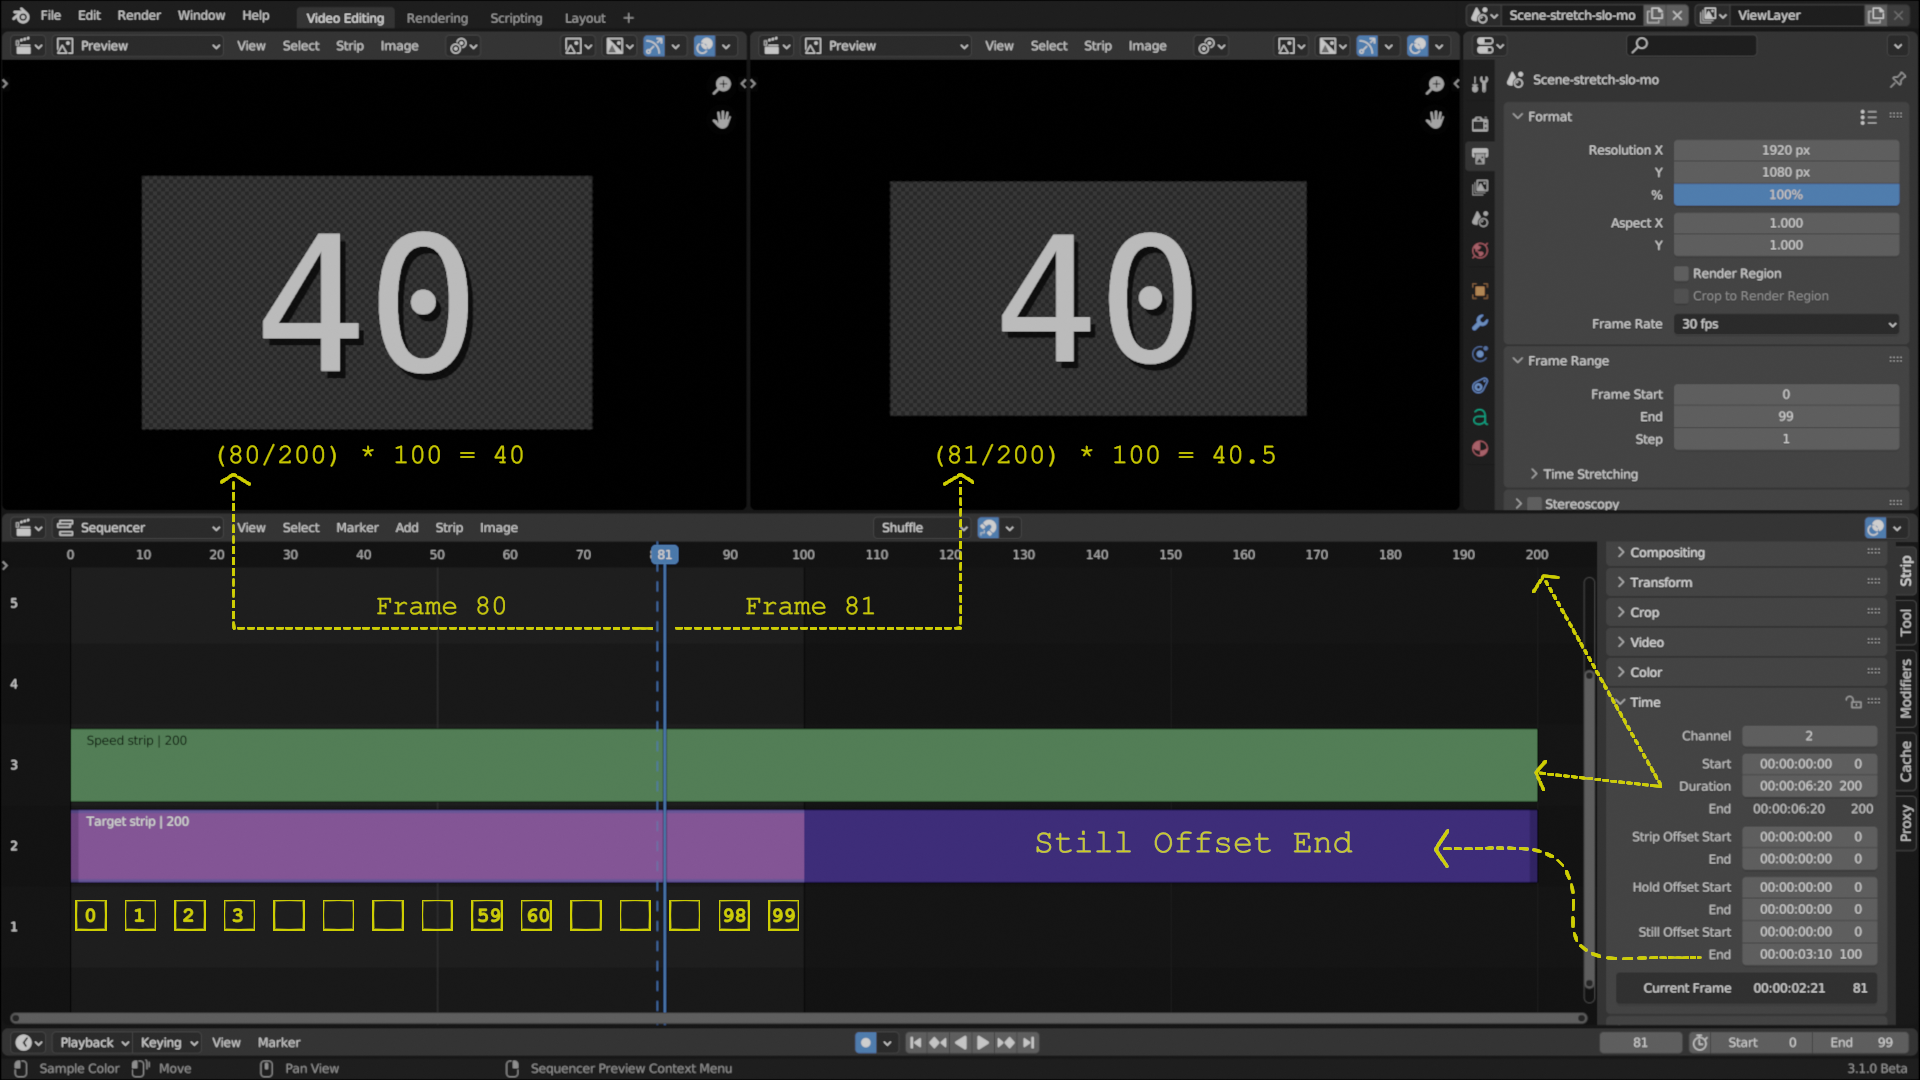
Figure 4: Speed Control - Stretch option with inserting frames
In figure 4, the Speed Control strip is twice as long as the original target strip. So, each frame in the Target strip has two copies in the Speed Control strip. This will reduce the playback speed effectively to half. For example: frame 80 (in the speed strip) gets the value of 80/200 * 100 = 40. Frame 81 will point to the same target frame (40.5) because each value is rounded down. Frame 82, however, will point to target frame 41 as well as frame 83.
The effect of the stretch option is controlled by the amount of the Strip Offset End or the Still Offset End. The Speed Control strip is not influenced by a Strip Offset Start, Hold Offset Start, Hold Offset End or Still Offset Start. These Offsets will only change the length of the preview by skipping the first or last frames but will have no effect on the speed.
Tip
The Stretch option can be very handy if the video and audio strip haven’t the same duration; mostly because of a mismatch between the framerate of the strip and the project. A change in video speed is often less noticeable than a change in audio speed (which will influence the pitch).
For example: a 10 seconds long 30 fps recorded movie has -of course- 10 seconds of audio and 300 visual frames. When you import this movie in a 24 fps project, you will still have 10 seconds of audio; represented by a greenish strip of 240 timeline frames (remember, the project is set to 24 fps). The blueish movie strip however will run for 300 timeline frames and will take 300 / 24 = 12.5 seconds. So, the audio strip is only 10/12.5 = 0.8 of the length of the movie strip. You have to slow-down the movie by setting the duration to 80% or adding a Strip Offset End of 60 frames.
- Multiply
After selecting the Multiply option in the drop-down, an additional field (Multiply Factor) is shown (see figure 5 - side panel). A Multiply Factor > 1 will speed up the preview. A factor < 1 will slow down the action. If the value = 0 (default) then the preview speed is the same as the presentation speed of the project.
Time lapse

Figure 5: Speed Control with multiply option - time lapse
The Multiply Factor in figure 5 is 1.5; so, the preview should be 50% faster than the presentation speed (fps). Each frame in the Speed Control strip represents the duration of 1.5 frames of the target strip. So frame 30 of the Speed control contains the value of target frame 30 * 1.5 = 45. Frame 60 gets the content of target frame 90. Because, some frames are skipped, the Speed Control strip will run out of frames before the end frame. When this occurs, it will just keep repeating the last one; the action appears to freeze. The last frame of the Target Strip (e.g. frame 99) will be displayed at position 99/1.5 = frame 66 of the Speed Control strip. From then on, the preview will always show the value of 99; e.g. the last frame of the target strip.
Slow motion
The Speed Control strip in Figure 6 has a Multiply Factor = 0.4. So, the duration of two frames of the target strip is even a little less than the duration of one Speed Control frame. The movie seems to play slower. There isn’t even any action until frame 3. Because of this lower playback speed, not all frames from the target strip could be shown in the equal-sized Speed Control strip. The last visible value at frame 99 is 39 (99 * 0.4).

Figure 6: Speed Control with multiply option - slow motion
The use of Offsets
Figure 7 is a special case because there is a Strip Offset Start and End. The Multiply Factor is set to 1.5. As a result of these Offsets, the visual duration of the Speed Control strip is reduced with the sum of both Offsets. The concept of Current Frame (see figure 6, side panel bottom) is very important here. Although the Playhead is located at frame 64 in the timeline, the Current Frame is actually 44. This is the number of frames, from the playhead (64) to the visual Start of the strip (20 or Strip Offset Start). The content of the Target strip, however is only reduced with the strip Offset Start. The first frame (frame 0) of the Target strip has value 20. The previous frames are no longer accessible. But frames 70 - 99 - even if they are not visible - are still accessible. Because of the Multiply factor of 1.5, the action seems to play faster (some frames are skipped).

Figure 7: Speed Control with multiply option - slow motion & offsets
You won’t get any visual clues in the effect strip that point to the direction or size of the speed effect. You have to deduce it from the preview.
Note
It is possible to enter and keyframe a negative Multiply value. This will reverse play the strip. See video below, for an example.
Figure 8: Speed control with keyframed Multiplication Factor
The target strip has a duration of 100 frames (1 - 100). A keyframe is set on the Multiply factor with value = 1 at frame 1 and value = -1 at frame 100. Note that a F-curve appears in the Graph Editor that runs from +1 (frame 1) to -1 (frame 100). It crosses the zero value at about frame 50. So, from frame 50 on, the Multiply factor is negative and the play direction should be reversed. The preview shows a value of about 25. This is because the Multiply factor < 1 in the range 1 -50; so, the speed slows down.
- Frame Number
This option provides you with maximum control. For each position of the Current Frame (playhead most of the timeline)), you can specify a frame number from the target strip to display in the Speed Control strip. Because you can keyframe this Frame Number value, you are able to specify custom speed profiles. For example, suppose you want a slo-mo effect as in figure 6 but only between frames 50 - 69. The other frames (before and after) should play at normal speed. Because the 20 frames between 50 and 69 are played with a Multiplication Factor = 0.4; only 5 frames are actually played and the rest is duplicated and inserted. So, the sequence should be :
Select the Speed Control strip with the option Frame Number and set the playhead at frame 0 (first frame). Normally, it should display the value 0; which is the first frame of the target strip.
Enter the value 0 in Frame Number. This means that the value to display comes from frame 0 from the Target strip.
Keyframe the Frame Number attribute (press I when hovering over the field). The field becomes yellow a an indication of the existence of a keyframe.
Set the playhead to frame 49. The Frame Number attribute is green; indicating that the value is governed by a keyframe that is not changed since. The value is still 0 and the preview is 0.
Change the Frame Number value to 49. The preview changes to 49 and the attribute color changes to brown. Keyframe this value (color changes to yellow)
Set the playhead to frame 50 and enter the Frame Number 50. Keyframe this value.
Set the playhead to frame 69 and enter the Frame Number 55. Keyframe this value.
Set the playhead to frame 70 and enter the Frame Number 56. Keyframe this value.
Set the playhead to frame 115 and enter the Frame Number 99. Keyframe this value. You have to increase the duration of the strip.

Figure 9: Speed Control with Frame Number option
- Length
As with the previous option Frame Number, this option will display a frame from the target strip but the frame number is specified as a percentage. For example, 50% will result in figure 7 as value 70. The strip length is 100 frames; so half of it is 50 frames. Because of the Strip Offset Start = 20; 50 frames from that point on will result in frame 70.
You can also keyframe this value as in the example from above.
- Frame Interpolation
Crossfades between frames to reduce screen tearing when the speed is slower than the original frame rate.
2.2.2.5.2. Examples
2.2.2.5.2.1. Creating a Slow-Motion Effect
Select the clip and effect strip. Set the Speed Control option to Multiply and the Speed factor to be the factor by which you want to adjust the speed. To cut the displayed speed by 50%, enter 0.5. Now, a 275-frame clip will play at half speed, and thus display only the first 137 frames.
If you want the remaining frames to show in slow motion after the first set is displayed, double the Length of the source strip (Time Panel > Duration). If you are using a speed factor other than 0.5 then use the formula:
new_length = real_length / speed_factor
2.2.2.5.2.2. Creating a Time-Lapse + Freeze + Slow-mo sequence
Action movies often use the effect of a speeded action up until a certain momentum, then a freeze for a few seconds, followed by a slow-motion; e.g. bullets flying, impact, and slow-mo explosion.
Suppose, you have a 150 frames sequence. The first 100 frames should be played at twice, the speed. Frame 100 should be freezed for 20 frames, and the following frames (101 - 150) should be played in slow-motion (half of the speed).
You could this easily by splitting the strip into three parts (0-100, 100, and 101-150) and using the techniques described above. You can also accomplish this with one strip and the Frame Number option.
Place the playhead at frame 0 and keyframe the field Frame Number (to zero).
Move the playhead to frame 49, change the value of Frame Number to 99 and keyframe again.
Move the playhead to frame 50, change the value of Frame Number to 100 and keyframe.
Move the playhead to frame 69, leave the value of Frame Number to 100 and keyframe.
Move the playhead to frame 170, change the value of Frame Number to 150 and keyframe.
To get even finer control over your clip timing, you can use the Graph Editor (see figure 10).

Figure 10: Speed control (option Frame Number) in combination with Graph Editor
The horizontal axis represents the Sequencer timeline. The vertical axis represents the internal frame sequence of the Target strip. As you can see, the first 50 frames in the Sequencer timeline run from frame 0 to frame 99 in the Target strip frame sequence, so, in fact, skipping each other frame. Frame 100 (from the Target strip) remains in place until frame 69 of the Sequencer timeline (=freeze). The slo-mo is illustrated by the fact that you need 100 frames from the Sequencer timeline to play only 50 frames from the internal Target strip frame sequence. Because the original Target strip only took 150 frames on the Sequencer timeline, you have to expand its duration up to 170 (the dark purple region at the right).
While it is possible to keyframe the Multiply factor, usually you want to keyframe the Frame number directly. The curve interpolation is set to Linear by default but you can change it to Bézier to create Ease In and/or OUT effects.
2.2.2.5.2.3. Changing Video Frame Rates
You can use the speed control to change the frame rate in frames per second (fps) of a video. If you are rendering your video to a sequence set, you can effectively increase or decrease the number of individual image files created, by using the Multiply option with the Multiply Factor.
For example, if you captured a five-minute video at 30 fps and want to transfer that to film, which runs at 24 fps, you would enter a Multiply Factor of 30/24, or 1.25 (and Enable Frame Interpolation to give that film blur feel).
Instead of producing 5 × 60 × 30 = 9000 frames, Blender would produce 9000 / 1.25 = 7200 = 5 × 60 × 24 frames. In this case, you set a start = 1 and end = 7200, set your Format output to for example jpeg 30fps, and image files 0001.jpg through 7200.jpg would be rendered out, but those images cover the entire 9000 frames. The image file 7200.jpg is the same at frame 9000. Be aware that there can be a quality degradation, due to the encoding.
When you read those images back into your film blend-file at 24 fps, the strip will last exactly 5 minutes.