2.2.1.6. Transform
We cover three operations in the Transform section: Split, Trim, and Group.
2.2.1.6.1. Split
Splitting a strip is separating the strip into two parts at the position of the playhead. Both parts continue to function as independent strips (who shares the same source). Splitting can be done on all strip types. Splitting an effect strip however will also split the input strip of the effect and vice versa.
In previous versions of Blender and also in a substantial part of the literature this operation was called “Cutting”. In a computer environment however this term is primarily used in the sense of copy-cut-paste, where it implicates delete. So, the term Split is preferred, although it stays very visible in terms such as Jump Cut, J- or L-Cut, ….
There are two variants of the command: Split and Hold Split.
- Split K
With the menu or the shortcut key K you can split the selected strip in two at the current frame. This will result in two strips which use the same source, fitting the original strip’s timing and length.
Warning
If you are using the shortcut K, then it matters which side of the playhead the mouse cursor is (see figure 1). If the cursor is at the left hand side of the playhead, then the left strip is the active one (white outline & text overlay) and therefore also selected. If the mouse cursor is at the right of the playhead, then the right strip is the selected strip (orange outline) but not the active one (no white text overlay). Contrary to what you might suspect, the Time fields then relate to the left strip; not the (selected) right strip.

Figure 1: Strip properties before and after Split command
Please note, that in figure 1 the result right after the Split command is issued, is shown in the second column. In the third column the right part of the Split is deleted. In the fourth column, the left part is deleted and the right strip is made the active one.
Also note that the Start frame of the left and right strip is the same: frame 1; even though the right strip starts visually at frame 8. This is accomplished with the Strip Offset Start field. And likewise, the premature ending of the left strip is done with the Strip Offset End field.
From either part of the split, you can restore the entire original strip. It suffices to reset the Strip Offset fields to zero. This can also be done by dragging the left or right handle.
- Hold Split Shift-K
The menu or the shortcut Shift-K splits a strip in two distinct strips; however you will not be able to drag the handles to show the frames past the split of each resulting strip.

Figure 2: Strip properties before and after Hold Split command
There are subtle differences between figure 1 and 2: the resulting strips are almost mirrored. Also, note that the first left part is renamed. For the Strip command, the most important part of the split operation seems to be the first (left) part. For the Hold Split command it is the second part.
The Start frame of the second (right) part and the End frame of the first (left) part are recalculated with the Hold Offset Start and Hold Offset End value. The name Hold indicates that the Start and End frame are fixed. The strip will start or end there and dragging the handles will not reveal any new frames.
As in the Split command, from either part of the Hold Split, you can restore the entire original strip. It suffices to reset the Hold Offset fields to zero. This cannot be done by dragging the left or right handle. The result of dragging is that the first or last frame is duplicated, inducing a Freeze Frame effect (see (see Time panel of Movie strip for more info).
Freeze frames
Suppose that you have the following strip (see figure 3) and you want to introduce some freeze frames effect.

Figure 3: Freeze frames example
The Freeze at the Start and End of the strip is easy. You only have to drag the handles to introduce a Still Offset (see Time Panel > Still Offset for more detailed information. The left panel of figure 3 has a still Offset Start of 3 frames and so has the Still Offset End field of the right panel.
The Freeze in the middle of the strip is more complicated. First, you need a Hold Split at frame 6 (playhead at 7) of the original strip. That way there is a Hold flag on frame 6 so that dragging the right handle will duplicate frame 6. You need this Hold flag on the left part of the split e.g. freeze.001. This is a Hold Offset End value of 4 because the original strip was 10 frames long.
The strip in figure 3 has a brown color because it is an image sequence. You can add the Still Offset fields to the Time panel with a little Python code (see useful scripts ).
Classic Cuts
- Jump Cut
A jump cut is a cut in film editing in which a single continuous sequential shot of a subject is broken into two parts, with a piece of footage being removed in order to render the effect of jumping forward in time. … Jump cuts tend to draw attention to the constructed nature of the film. (From Wikipedia) In essence, a jump cut allows the editor to jump forward in time.
It can also be used in conversations and interviews, to jump from the perspective of speaker 1 to that of speaker 2.
- L-cut and J-cut
In an L-cut, you are hearing the audio from the previous shot, even though you are viewing another shot. The name of the L-cut is derived from the shape of the resulting edit (see figure 4)
A J-Cut is essentially the opposite of an L-Cut. Here you hear the audio before you see the video. So, the audience is is looking at strip 2 but still hearing audio from strip 1 (see figure 4).

Figure 4: Example of L- & J-Cut
- Action cut
An action cut is made when you cut in the middle of an action to another shot that matches the first shot’s action.
2.2.1.7. Trim
Trimming is changing the duration of a strip by altering the In and Out point. In figure 1, the original strip of channel 2 starts at frame 1 and has a duration of 11138 frames. It is duplicated to channel 3 and trimmed. The new In point is at frame 2226 (1 + Strip Offset Start) and the new Out point at frame 7665 (Duration - Strip Offset End). As already discussed in the section on the Time panel or the Split operation trimming and splitting is done with the use of the Strip Offset fields.
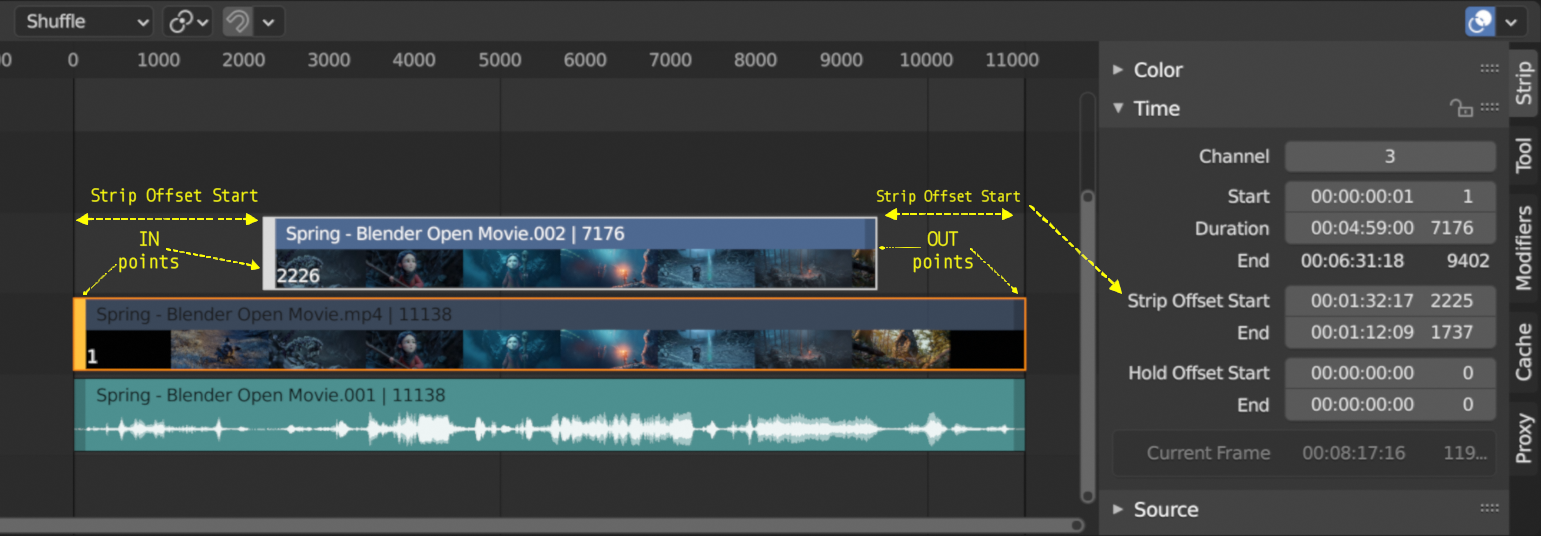
Figure 1: Trimming a movie strip
Trimming of strips is mostly done with the mouse. You can however also change the Strip Offset fields directly by entering a value with the keyboard or use the slider of the property. Values can be negative. This will result in duplicating (freezing) the first and/or last frame.
- LMB Click on handles and dragging
The Strip Offset Start property of a strip could be selected by LMB Click on the left handle of the strip. In figure 1 this handle has a white color for the selected and active strip and an orange color for the selected but non-active strip. Holding the LMB down and then moving the mouse left/right changes the IN point of the selected strips by the number of frames you moved it. The frame number label at the bottom left corner of the strip displays the frame number of the new IN point, only if the height of the strip bar is sufficient (see figure 1).
If you have a 20-image sequence strip, and drag the left handle to the right by 10 frames, the strip will start at image 11 (images 1 to 10 will be skipped). Use this to clip off a roll-up or undesired lead-in. Dragging the left arrow left will create a lead-in (copies) of the first frame for as many frames as you drag it. Use this when you want some frames for a transition at the start of the clip.
The Strip Offset End of a strip could be selected by LMB Click on the right handle of the strip; holding it down (or pressing G grab) and then moving the mouse changes the OUT point within the strip. The frame number label at the bottom right corner of the strip displays the frame number of the OUT point.
Dragging the right arrow to the left shortens the clip; any original images at the tail are ignored. Use this to quickly clip off a roll-down. Dragging the right arrow to the right extends the clip. For movies and images sequences, more of the animation is used until exhausted. Extending a clip beyond its end results in Blender making a copy of the last image. Use this for transitions out of this clip.
You can select multiple left or right handles of different strips with Shift LMB. The selected handles are colored: white for the active strip and orange for the non-active strips. LMB Click & drag on any selected handle will move all selected handles in the same direction as your mouse movement and with the number of frames that the mouse is moved.
Note
Selecting handles can be done with the LMB, the special Box Select with Handles (Ctrl B) or the the menu Select > Handle; see section on Selecting for more details.
- LMB Click on handles and G (Grab)
In stead of LMB Click on handles and dragging, you could also select all handles and press G. This will result in the same trimming. The advantage is that you don’t need to click and drag on a strip area. It is sufficient to press G and move the mouse (where ever it is positioned).
- LMB Click on strips and E (Extend)
You can move or extend/shorten (thus, trimming) selected strips without selecting the handles with the E key or the menu Strip > Transform > Move/Extend from Current Frame key. However, the position of the Current Frame (playhead) and the initial mouse position are important here.
If the playhead is outside the range of the selected strips, the E will move the all selected strips in the direction of the mouse movement. This mimics the move behavior of an entire strip with G key.
If the playhead is within the range of (some) selected strips, the E key will trim the selected strips. If the mouse is at the left side of the playhead, the IN points of the selected strips will follow the direction of the mouse (as if trimming with the left strip handle). If the mouse is at the right side of the playhead, the OUT point will follow the direction of the mouse (as if trimming with the right strip handle).
In summary, all selected strip handles from the “mouse side” of the current frame indicator (playhead) will transform together, to move or extend/shorten the selected strips.
- Clear strip offsets: ALT O
All the trimming of selected strips can be cleared with the Alt O or the menu Strip > Transform > Clear Strip Offset. The Strip Offset Start and End fields are reset to zero for the selected strips.
- Precision trimming
Although the movie strips of the sequencer timeline can display thumbnails (Show Overlay > Thumbnails), trimming with precise visual feedback is not possible with these thumbnails.
The Preview window however only shows the Current Frame (frame at the position of the playhead) by default. With the menu View > Preview during Transform of the Preview window, you can enable precision trimming. The Preview window will temporarily display the frame at the position of the selected handle of the active strip (see figure 2).
Figure 2: Trimming with Preview during Transform enabled (example from Tin2Tin)
- Esc
Pressing Esc while trimming will reset the strip handles to the original position and will cancel the trim operation.
2.2.1.7.1. Group
Selected strips can easily be grouped together into one so-called meta strip with Ctrl-G. A Meta Strip is a strip that can contain multiple strips, but is treated as if it was one strip. The max number of strips that can be grouped is 128, due to the max number of available channels in the sequencer. The duration of the Meta strip will span from the earliest Start time until the latest End time of any strip.
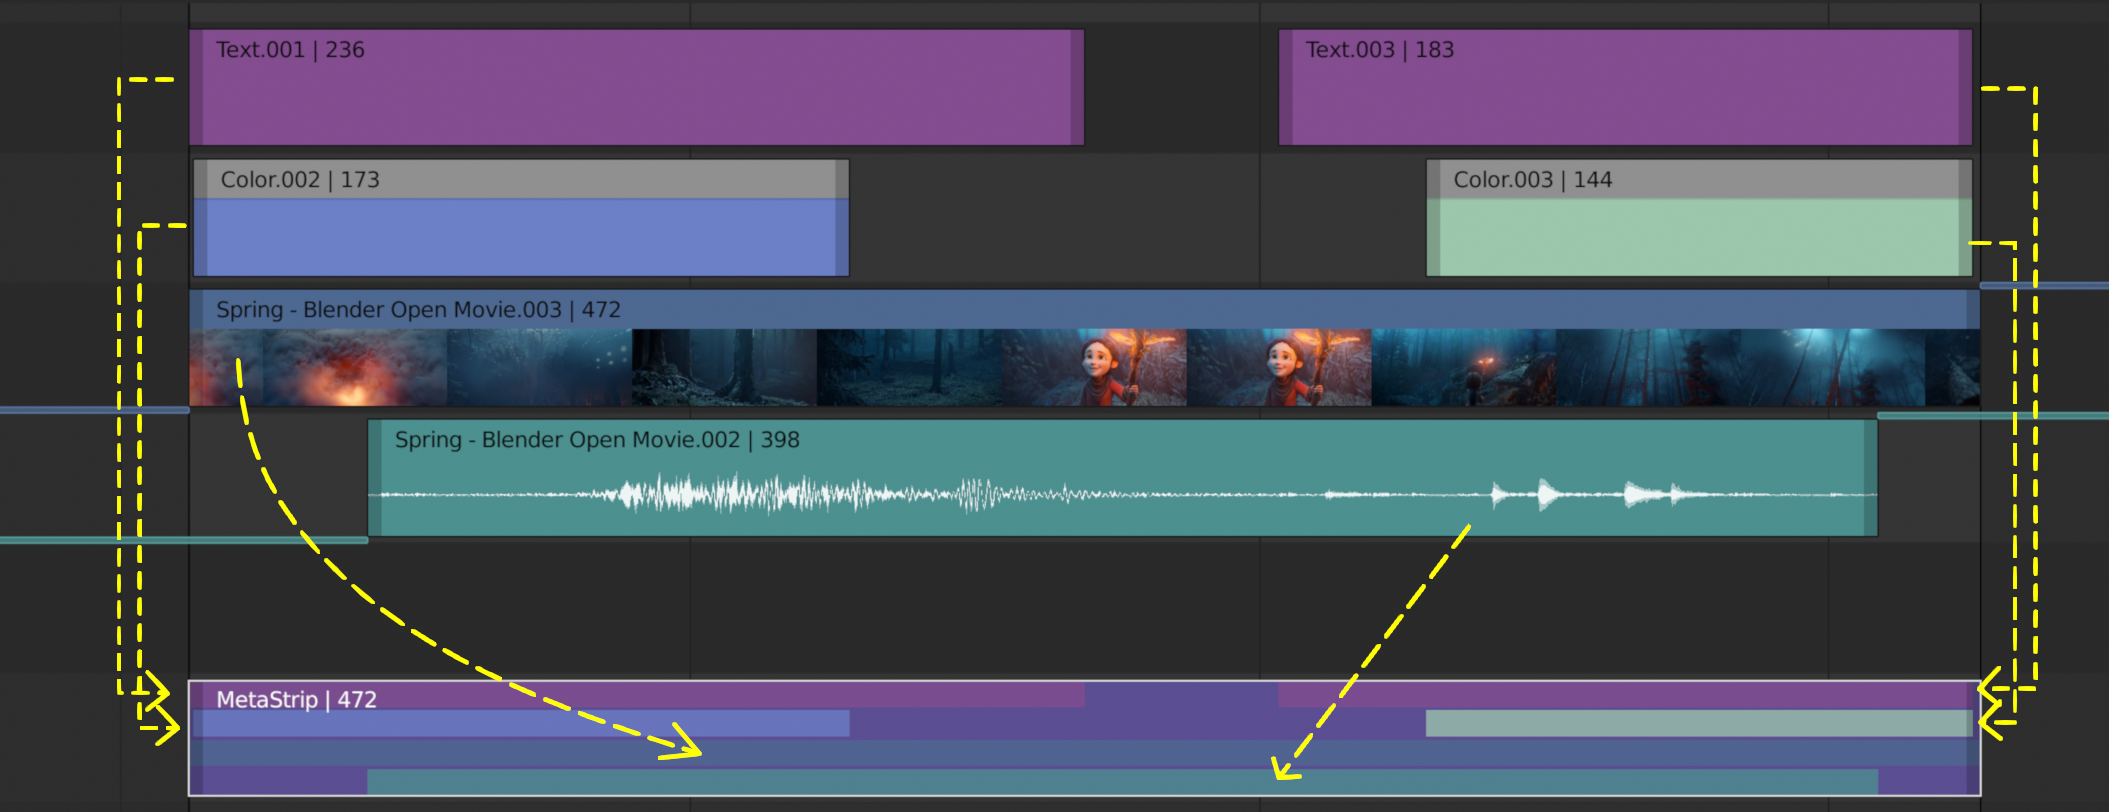
Figure 1: Example of Meta strip.
The Metaaaa strip has a very specific appearance because the channels of the grouped strips are represented by small horizontal bars within the Meta strip. In figure 1, the grouped strips occupy 4 channels, so the Meta strip contains 4 (small) horizontal bars. The grouped strips themselves are represented by their own color in the Meta strip. For example, the two purple areas at the top come from the text strips at channel 6. The color of the Meta strip itself is blueish purple, which covers the areas where no grouped strip is available. If there is only one strip to group, then the color of the Meta strip is very similar to the grouped strip (most of the time a little darker) and it’s hard to recognize a Meta strip as such.
The Meta strip replaces the selected strips in the sequencer timeline and is placed at the channel of the active strip. This could result in somewhat unexpected positions when box selecting the group (the active strip isn’t changed by box selecting).
Note
Figure 1 is a bit misleading because a Meta strip and the grouped strips could never be visible at the same time in the timeline. The Meta strip replaces the grouped strips.
Figure 1 is made by creating a Meta strip, duplicating it and un-meta-ing the duplicate.
The Meta strip is in fact a completely new strip with its own (independent) properties such as position X & Y, scale, rotation, …. It’s like if the grouped strips are rendered out and the render result is imported back into the timeline as a new (meta) strip. For example, increasing the duration of the grouped strips after creating the Meta strip will not increase the duration of the Meta strip. You have to do that manually by dragging the strip handles.
Meta strips can be nested. For example, you can copy one Meta strip and paste it into another.
- Make Meta Strip Ctrl-G
To create a Meta strip, select all the strips you want to group, and bd:Ctrl-G to group them. The Meta strips will span from the beginning of the first strip to the end of the last one, and condenses all channels into a single strip. The Meta strip is placed at the channel of the active strip.
- UnMeta Strip Ctrl-Alt-G
Separating (ungrouping) the Meta strip restores the strips to their relative positions and channels. This can be used if you choose to delete a Meta strip and want to keep the strips inside.
Be aware that effects added to the Meta strip will be removed.
- Edit a Meta strip Tab
You can edit the content inside a Meta strip by pressing Tab. This will expand the strip to the original group and hide any other strips. To exit the Meta strip press Tab again. Meta strips can also be nested, which make editing them a little confusing. To exit out one level of Meta Strip make sure you do not have a Meta strip selected when you press Tab (select nothing or anoter regulare strip).
Warning
Adding effects e.g. Glow to a Meta strip is possible but the effects will be removed if you unMeta the strip.
The default blend mode for a Meta strip is Replace (all strips below will not be visible). There are many cases where this alters the results of the animation so be sure to check the results and adjust the blend mode if necessary.
Because of the above, adding a new strip to an existing meta strip should not be done by unMeta, followed by adding the new strip and recreate the Meta strip again. Better is to copy the new strip (on the clipboard), go into the Meta strip (Tab), paste the new strip and go out of the the Meta strip.
The Meta strip is primarily an organization tool but has numerous other use cases.
If you are using a lot of strips with complicated arrangement, you can group them together using Meta strips. It allows you to reduce the vertical space used in the Sequencer.
You can extend the limit of 128 channels with Meta Strips. The grouped strips will occupy only one channel.
A Meta strip is a handy way to keep audio and video together in a synced way. Unfortunately, you will loose the advantage of thumnails.
You can use it for adding speed effects in a simpler manner. See Blender Frenzy for a detailled tutorial about the procedure.
One convenient use for Meta strips is when you want to apply the same effect to multiple strips. It is much more convenient to apply a single set of effects to one Meta strip than applying it to each individual strip. It is also possible to do the similar task described above with an Adjustment Layer.