1.2.2. Toolbar
The Toolbar can be toggled on or off with or the shortcut T. It contains 12 tools; spread over 8 icons (see figure 1, left side).

Figure 1: Sequencer & Preview with Toolbar
Figure 1 shows the Sequencer & Preview View of the Sequence Editor. This means that the Toolbar (at the left) and the Sidebar (at the right) contain entries that apply both to the Sequencer and Preview View. For example, the Blade tool (left bottom) is normally only visible in the Sequencer view. The Sidebar also contains panels from both views.
- Select tool W
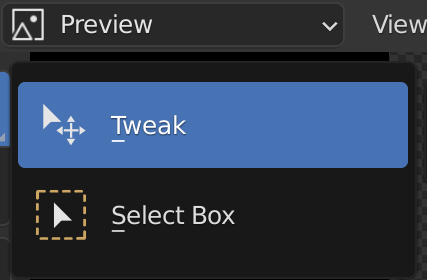
Figure 2: Select tool with sub-tools
The Select tool contains two sub-tools; indicated by the small triangle at the bottom-right corner. The last selected sub-tool is displayed on the icon when collapsed. Selecting a strip in the Preview will also select the strip in the Sequencer and vice versa.
The Tweak sub-tool is the regular select tool. With Shift pressed, you can select multiple strips. The strip with the white border is the Active object; those with an orange border are selected (but not active). The tools from the Toolbar will act on all selected strips. The Properties from the Sidebar will only affect the Active object. For example; strip 1 and 3 are selected (with strip 3 the active one). Both will be rotated, if done with the Rotate tool. But, only strip 3 will be rotated if done with the Rotate field in the Side bar. However, pressing Alt Enter after entering a value in the Rotate field will also affect both strips.
In the Sequencer view all strips are stacked at the same position in different channels. Strips at a higher channel lay on top in the Preview window. Therefore, strip 1 is overlapped by strip two; which is overlapped at its turn by strip 3.
Warning
Strips can be on top of other strips (e.g. strip 6 in figure 1). Clicking within the area of strip 6 (with the Tweak sub-tool selected) will however select the blue color strip beneath it. Clicking a second time will select strip 6. In other words, when clicking on a shared pixel of overlapping strips, the strip from the lowest channel in the Sequencer view will be selected first and then upon further clicking the channels above.
The shortcut for the Select tool is W. The mouse cursor must be above the Preview window. Pressing W consecutively will toggle between Tweak and Box Select mode.
If the Select Box sub-tool is selected, you can drag a dashed line rectangle in the Preview window. Every strip that has at least one pixel within this rectangle will be selected. Note however that the active strip is not changed.
Warning
You can also just click without dragging with this sub-tool. You will select then a single strip. The active strip however is changed.
- Cursor tool
The white-red circle with a crosshair is called the 2D cursor. You can place this cursor at any location within the preview window (including the area outside the Render region). This cursor in itself doesn’t do anything but is used in conjunction with the Pivot Point (to the right of the View menu in the Header).
Setting the Pivot point to 2D Cursor will scale and rotate all strips in relation to this point. For example, strip 2 will be rotated in a kind of circle path with the 2D cursor at its center.
You can only switch the display of this 2D cursor off by disabling all Overlays (rightmost button in the Header).
- Move tool
The shortcut for the Move tool is G (Grab). You can also click on the Move icon in the toolbar and start dragging the strip. A message appears beneath the menu: Dx:0.0000 Dy: 0.0000 (0.0000); indicating the distance in pixels that the strip has been moved in the X and the Y direction. The number between parenthesis is the Euclidean distance that has been moved.
You can constrain the movement in different ways: along the X or Y axis, in smaller or larger increments or by specific number of pixels; see Montage > Move for a more detailled description.
If the Active Tools option is enabled in Show Gizmo (see figure 1); you can also move the strip by dragging the gizmo.
The result of the Move operation is also visible in the Position X and Y fields of the strip Properties. Of course, you can also update these fields directly.
- Rotate tool
The shortcut for the Rotate-tool is R (Grab). You can also click on the Rotate icon in the toolbar and start dragging (in a circle) the strip. A message appears beneath the menu: Rotation: 0.0; indicating the angle in degrees that the strip has been rotated. A positive number is a clockwise rotation; a negative number is counter-clockwise rotation. You can rotate more than 360° and also more than one strip at the same time. By default, the rotation is around the Median Point of the selected strips. You can change however the Pivot point (see figure 1).
The further away the mouse cursor is from the Pivot point, the slower the rotation movement is. So, to accomplish a very fast rotation (but difficult to fine-grain), place the mouse cursor very near the pivot point.
As with the Move tool, you can constrain the rotation. Pressing Shift while rotating will reduce the rotation increment; so that you can fine-tune the result (the result is also visible in the Rotation field of the strip Properties). To specify a specific rotation angle, enter a number after the R. For example, R-90 will rotate the strip 90° counter-clockwise. You can also use the Arrow-keys to move the Rotation handle horizontally or vertically.
If the Active Tools option is enabled in Show Gizmo (see figure 1); you can also rotate the strips by dragging the gizmo.
- Scale tool
The shortcut for the Scale-tool is S (Grab). You can also click on the Scale icon in the toolbar and start dragging along the X and/or (both is also possible) axis. The further away the mouse cursor is from the Pivot point, the smaller the scaling unit is and the more precise you can work. A message appears beneath the menu: Scale X: 1.0000 Y:1.0000. This means that the Scale tool uses the Local view. For example, you have scaled a strip already to 0.8. The second Scale operation will again start as size 1.0. So scaling the second time to 0.5, will scale the strip in absolute (global) terms to 0.4 or 40% of the original size. A number > 1 will scale the strip up; a number smaller than 1 will scale it down.
The scaling occurs with the Pivot point as reference. So, for example, if the Pivot point is set to 2D Cursor, scaling down a strip will also move the strip in the direction of the 2D cursor. s
Pressing Shift while scaling will reduce the scaling unit; so that you can fine-tune the result You can also use the Arrow-keys to move the Scale handle horizontally or vertically.
If the Active Tools option is enabled in Show Gizmo (see figure 1); you can also scale the strips by dragging the gizmo.
- Transform
The Transform tool supports any combination of Grab, Rotate and Scale at the same time. In figure 2, the Transform tool is enabled and strip 3 selected.
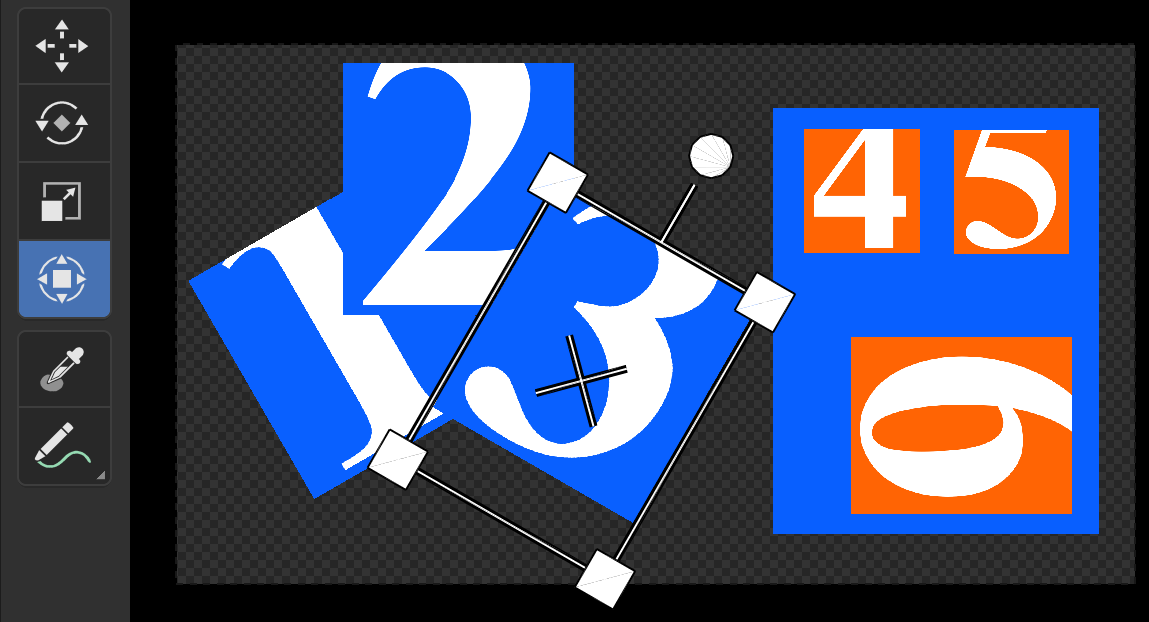
Figure 2: The Transform tool
With the four squares at the corners of the strip, you can scale the strip. The circle on top is for rotating and the crosshair in the middle is for moving the strip.
- Sample
The Sample tool (with the little eyedropper icon) can be used to sample a pixel’s color. Be sure that the Sample Tool is selected (which is by default) and LMB - Click anywhere in the Project Preview area. Information about the pixel under the mouse cursor appears in the status bar.

Figure 1: Sample Tool in action
The Preview window of figure 1 contains a simple Color strip with RGB values (0.8, 0.7, 0.4) or the equivalent HSV values (0.142, 0.5, 0.8). These values are set with the Color Picker. They are also shown in figure 1. LMB - Click on the bottom-right corner of the Preview (position X = 1870 and Y = 79; see figure 2) will show a status bar, containing the following info:
The X and Y coordinates of the clicked pixel. Remember that the left bottom corner is location (0,0) and that the project resolution is set to 1920 x 1080.
The values for the Red, Green, and Blue component as from the Color Picker.
The Alpha value of the pixel.
The Color Managed values of the Red, Green and Blue component or the color as you see in the Preview.
The Hue, Saturation, Value and Luminance equivalent values of the Color Managed values.
The Color Managed values are the result of applying the View Transform function from the Color Management panel. For the Video Editing Workspace, this is by default the Standard View Transform. This Transform function does not change the display device color values.
Note
If your colors look a bit “washed” out, then better check the View Transform function. If you started your project from another workspace than the Video Editing Workspace, this function is set by default to Filmic. This Transform function does change your colors (makes them “washed out”). Luckily, the VSE resets the Transform function to Standard, but only if the first added strip is a movie or image. If you add, for example a Scene strip as the first strip, the Transform function will not be changed.
Todo
Reference to the color management section or short explanation about RGB –> HSV conversion and/or transform function.
- Annotate
With the Annotate tool, you can draw free-hand annotations onto the Preview window (thus, also outside the Project Preview area). This is a handy tool to give some instructions if you are working in team on a project (or to your later self). These annotations are saved with the Blend-file.
The Annotations and its Settings are stored in the Annotations panel in the Side bar. To remove all annotations, just click on the Unlink button.
More information about the Annotate tool can be found in the User Interface section of the docs.