1.1.1. Header
The Header of the VSE is by default located at the very top of the editor. You can however flip it to the bottom RMB on header ; see Header > Context menu for more info about the available options. There are three areas within the Header.
1.1.1.1. Type Selector buttons
The left area contains the Editor Type selector and the View Type selector (see figure 1). As the name implies, you can swap the entire editor to another type (e.g. Compositor) with the Editor Type selector. With the View Type selector you can select a specific view: Sequencer, Preview or Sequencer/Preview. Depending on the selected type, you’ll get slightly different headers.
1.1.1.2. Menu bar
The middle area contains the menu bar. Again, the menu can be toggled on or off with the context menu. Figure 1 shows the menu bar with the expanded menu items beneath.

Figure 1: Header of the Sequencer View with panels expanded
The menus Select, Marker, Add and Strip are discussed in following sections or in the Video Editing chapter, when they appear in our typical workflow. The View menu contains many items which are specific for operation within the Sequencer; so, they are discussed here.
1.1.1.2.1. View Menu
See figure 1 (left panel) for an overview of all the submenus of the Sequencer’s View menu.
- Sidebar N
Show or hide the sidebar. You can use the shortcut N or the Sidebar button (see figure 1) to toggle on or off. This sidebar appears at the right of the sequencer and will show all the properties of the active strip. Please, note that the active strip does not need to be a selected strip (see Selecting). A detailled description of all the properties of the various strip types can be found in the Video Editing section.
- Tool Settings
Show or hide the Tool Settings (below the menu bar). These Tool Settings are mostly used in combination with the Toolbar (T). For example, if you select the Blade tool in the Toolbar, than you can choose between Soft and Hard in the Tool Settings.

- Toolbar T
Show or hide the toolbar. You can use the shortcut T or the Toolbar button (see figure 1) to toggle on or off. The toolbar in the Video Sequencer is rather minimalistic and not useful. It contains only a Select and Blade tool.
Warning
Both generic tools don’t seem to work. Some addons, for example the VSE Transform Tools make better use of this toolbar.
- Adjust Last Operation
If enabled, this option will display a pop-up panel to alter properties of the last completed operation. For some general background info, see Adjust Last Operation.
For example, after a Duplicate Strip operation, you can still change the horizontal and vertical Offset. Or after a Split operation, you can change the type of split (see figure 2).

Figure 3: Examples of Adjust Last Operation
- Preview as Backdrop
Displays the current frame in the background of the Sequencer (like in the Compositor). The backdrop will be updated when the playhead is moved. Of course, when there are a lot of strips in the sequencer, they will occlude most of the backdrop image. When you open the Sequencer in Full View , this could be an alternative of having the preview window on a separate monitor.

Figure 4: Backdrop of movie in the sequencer
- Frame Selected - Frame All - Zoom
These menu items are all about zooming in or out of the Sequencer window. This topic is covered more in depth (with all shortcuts) in section Zoom
- Refresh All
To force Blender to re-read in files, and to force a re-render of a scene strip, click the Refresh All button. Blender will update and synchronize all cached images and compute the current frame.
Whenever there are unexpected glitches in the playback, there is a chance that the cache is not updated and you need to do a Refresh All. For example, suppose you have a scene strip (see Strip types) in the Sequencer. Changing something in the source scene (e.g. rotating an object) will not force the Sequencer to update the cache. In the Sequencer you will see the object as if not rotated. Moving with the playhead will refresh the cache but not all at once; so there can be glitches (some frames are updated in the cache, others are not). Better is to use the Refresh All button, which will invalidate the cache and rebuild it. Another use case is when you add an image that is changed later on in an external program. Blender has no real way of knowing this. So, the image should be read in again and the cache should be updated.
Remember that the mouse pointer should be over the correct area: the Sequencer timeline!
- Navigation
Navigating your timeline is done by moving the playhead. The Navigation submenus are covered in detail in section Navigate
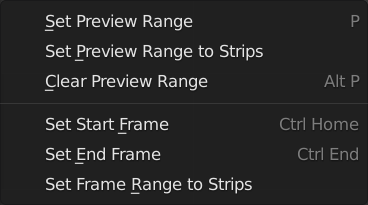
Figure 5: Submenu Range
- Range
With the menu Range you can specify which frames are going to be previewed or rendered. The first three menu items (see figure 5) will change the Preview Range or Playback Range. The last three menu items are meant to set the Render Range.
- Set Preview Range P
Interactively define the frame range used for preview or playback. After selecting this menu item, a crosshair cursor appears. With this cursor you can drag a box around the frames that you want to preview. You can drag anywhere within the Sequencer area. The selected Preview Range will be displayed in the normal black color. The frames outside the Preview Range will be colored brown (see figure 6). The Shortcut P is, of course, much faster to apply.
This Preview Range will not affect in any way the Render Range. Both can exist independently.
- Set Preview Range to Strips
Sets the Preview Frame range to the range of the selected strips.
- Clear Preview Range (Shortcut: Alt-P)
Pressing Alt-P anywhere within the Sequencer area will clear the preview range. If no Preview Range is defined, then the Render Range willbe used to playback or Preview the movie.

Figure 6: Preview & Render Range
The Render Range is normally set during the Setup phase of your project (see Project Settings). They also can be set in different editors: Properties , and Timeline.
- Set Start Frame Ctrl-Home
Set Start of Render Range to the current playhead position.
- Set End Frame Ctrl-End
Set End of Render Range to current playhead position.
- Set Frame Range to Strips
Sets the Render Range to the frame range of the selected strips.
- Sync Visible Range
The VSE is a time based editor. But, so is the Dope Sheet, the Graph Editor, and the Timeline. Finetuning animation is often done in the Graph Editor. So, these two editors should work in synchronization. The playhead is always synchronized between editors. If the playhead is at frame 15 in the Sequencer, then it will also be at frame 15 in the Graph Editor. The Visible Range, however, is not synchronized by default. So, you could see the frames 15 -150 (= Visible Range) in the Sequencer and a totally different Visible Range in the Graph Editor.
Sometimes you could benefit from a synchronized Visible Frame. Zooming in at the Sequencer will also zoom in at the Graph Editor. For that, you need to enable this option.
Warning
Currently, if we open the side panels of the animation editors (N or T panels) then the ‘Visual Range’ shrinks or expands depending on the side panel sizes. This happens even if we have enabled the ‘Region Overlap’ (Preferences > Interface > Editors > Region Overlap > Enabled) making the option useless.
Todo
Give a meaningful example for this option.
- Show Seconds Ctrl-T
By default, the timeline units are so-called SMPTE timecodes, e.g. 12+08. This is the time after 12 seconds and 8 frames. Disabling this option will show the timeline in frames (see figure 7).

Figure 7: Enabling/disabling Show Seconds option
- Show Markers
This option is set by default. It shows the markers region (see figure 8). When disabled, the Markers region but also the Markers menu is hidden and the markers operators (adding, deleting, …) are not available in this editor.

Figure 8: Marker area with three markers
Todo
The use of Markers is described more in detail in …
Show Cache, Sequence Render Image, Sequence Render Animation, Export Subtitles
Cache is described in section Video Editing > Setup > Environment > Proxies & Cache.
Rendering is described in section Video Editing > Render.
Subtitles are described in Video Editing > Edit > Sound.
Todo
Add links to those sections
- Toggle Sequencer/Preview Ctrl-Tab
Switch the editor display type between Sequencer and Preview. With the shortcut Ctrl-Tab you can toggle very fast between these two views. This command is especially useful if you are editing with the Sequencer in full view.
- Area
With this menu you can redefine the area that the Sequencer occupies. All options are described in detail in the user interface section https://docs.blender.org/manual/en/dev/interface/window_system/areas.html?highlight=area
1.1.1.3. Overlap dropdown
When moving a strip in the sequencer, you can drop it onto other strips. With this dropdown, you can specify how to resolve the overlap after transformation. The available options are: Shuffle, Overwrite, and Expand. They are described in more detail in video editing > montage > move
1.1.1.4. Snapping
If the Snapping option is enabled, moving strips in the sequencer will snap them at the border of other strips (or even the playhead). Thin white lines are displayed when the strip is nearby a border of another strip. With the dropdown, you can eanble some specific options (for example, ignoring sound strips). More detail in video editing > montage > move.
1.1.1.5. Show Overlay button
On the extreme right in the header, you find the Show Overlay button (see figure 9). You can enable of disable it completely with LMB - Click or you can enable/disable one of the options The area at the right contains one or three buttons. By default, Name, Source, Duration, F-curves, and Waveform Display are set.
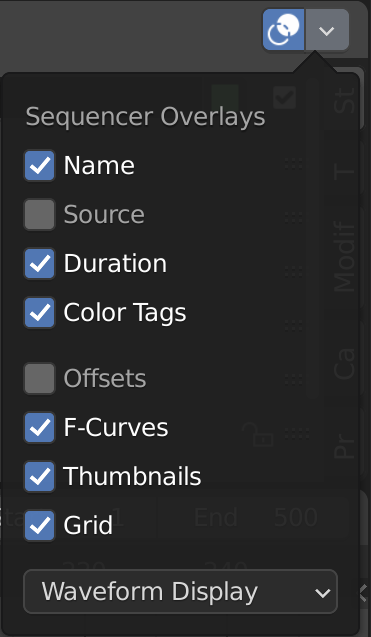
Figure 9: Preview Overlays
- Name
Enabling this option will show the name of the strip on top of the stripbar; aligned left at the start of the strip. The name of the strip is set in the Properties.
- Source
With this option you can show the source filename and path of the strip. The source is set in the Source panel
- Duration
With this option the duration will be displayed. The duration is always set in frames. The Duration can be set in multiple ways. The numeric value is available in the Time panel
- Color Tags
The Color Tags option will switch on the display of the choosen color in the Properties panel of the strip (see figure 10). The default colors are set in the Preferences; see Strip types

Figure 10: Color Tags
- Offsets
When creating a Split, the Offset fields get a value. With this option, you will visualize these values with a little blue bar. Only available for the Strip Offset Start and Strip Offset End field. See text on splitting
- F-curves
When animating, for example adding a Fade effect, a F-curve is created. In fact, you are animating the Opacity property of the strip. You can visualize the F-curve with this option.

Figure 11: F-curves
- Thumbnails
For Movie, Image Sequence and Image strips you can display thumbnails. The example in figure 12 has 30 frames; each with a blue background and the frame number in yellow as foreground. To draw thumbnails, this overlay has to be enabled and the strip bars must be tall enough. In order to be recognizable, a thumbnail channel should be at least about 92 pixels (see figure 12; bottom strip). The width of the thumbnail is calculated in accordance to the aspect ratio of the actual image. In figure 12, the width of the strips at the left side does not vary across zoom level because the strip height isn’t changed either. The strip at the top right however has a much larger height, and therefore also a larger width.

Figure 12: Thumbnails at different zoom levels
The number of thumbnails depends on the thumbnail size (see above) and the strip length (which depend on the zoom level). The first frame of the strip is always shown as a thumbnail.
The thumbnails are loaded from source file using separate thread and stored in cache. Cache capacity is limited to 5000 thumbnails and performs cleanup of non visible images when limit is reached.
- Grid
If enabled, thin black vertical lines are displayed in the sequencer every n frames. The number of frames depend on the zoom levels but starts at every 1000 frames (if zoomed out sufficiently) and decrements while zooming in to 500, 200, 100, 50, 20, 15, 10, 5, and eventually stops at every two frames. This grid is a visual aid to recognizing the location of strips in the timeline.
- Waveform Display
In figure 9, this option is already expanded. You can choose to override the Strip Option and display (waveforms On) or not display (Waveforms Off) the waveform of a sound strip in the strip bar. The Strip option is set in the Sound Properties of the Sound strip.