1.1.2.3. Navigate
Navigating in your timeline is done by moving the playhead, so that you can see the selected frame in the preview window. The playhead is the blue vertical line with the previewed frame number at the top.

Figure 1: Playhead details
In figure 1, the playhead is positioned between frame 3 & 4 and indicates with the little blue square at the top that frame 4 is in the Preview window. So, the playhead is always positioned at the start of the previewed frame.
Warning
There could be some confusing regarding the term Current Frame. According to the Strip properties > Time panel, the Current Frame is frame 3, although the playhead and the Preview window show frame 4. This is because the Current Frame field in the Time panel is a relative measure: it is the position of the Playhead relative to the visual start (≠ the Start field) of the active strip.
In figure 1: playhead is at frame 4; the strip starts at frame 1; Current frame = 3; you have to move 3 frames from the playhead to get at the visual start frame.
If the strip should start at frame 0, then the Current frame should be 4.
If the strip starts at frame 5 and the playhead is at frame 8, then the Current Frame = 3.
1.1.2.3.1. Jumping
- Jumping to a specific frame
The Playhead can be set or moved to a new position by pressing or dragging with the LMB in the scrubbing area at the top of the timeline. This is the area with the frame numbers or time codes.
This can also be done by pressing or dragging with the Shift RMB in the scrubbing area of the sequencer. The scrubbing area of the sequencer is the entire area, including the existing strip bars. See figure 2 for a visualization of the scrubbing areas.
The playhead can be set to a specific frame by entering the frame number in the Current Frame field of the Timeline Editor; usually at the very bottom right hand side.
- Moving frame by frame
The Playhead can be moved in single-frame increments by pressing the cursor keys Left or Right.
Rolling with the MMB while holding Alt (Alt-Wheel) will also move the playhead frame by frame.
- Jump to boundaries
You can jump to the Frame Start or Frame End of the project by pressing Shift-Left or Shift-Right. These two fields are set in the Properties Editor > Dimensions panel or in the Timeline Editor (bottom right).
The same could be done by clicking the Jump to Endpoint transport controls in the Timeline Editor
Pressing PgUp or PgDn will move the playhead to the start of the next or previous strip (over all channels). The same could be obtained by holding Ctrl after you have started dragging with the LMB in the scrubbing area of the timeline.
Pressing Alt PgUp or Alt PgDn will move the playhead to the center of the next or previous strip (over all channels).
1.1.2.3.2. Scrubbing
Scrubbing is used to quickly review a project in the preview window, without much concern about the exact timing. This can be a very processor intensive job: jumping around and previewing dozens of frames within a split of a second. So, there can be some lag or stuttering. The use of proxies (eventually with a very low resolution) is indicated here.
Scrubbing is done by dragging with the LMB in the scrubbing area (see figure 2, yellow text and arrows) at the top of the timeline or with the Shift RMB in the scrubbing area of the sequencer (see figure 2, orange text).
Figure 2: Scrubbing area
As can be seen in figure 2, you can use both timelines: from the sequencer at the top or from the Timeline Editor at the bottom. Scrubbing at the timeline at the bottom will also move the playhead at the top. Please note, that both timelines are also synced (same frame range, same playhead position). For this, you need to set the option
Sync Visible Rangeunder the View menu for both timelines.When you drag with Shift-RMB directly on a sequence strip, this will show the strip solo, temporarily disregarding effects and other strips, showing only this strip’s output (indicated with the white text and arrows in figure 2). For example, if you have two color strips on top of each other, normally you see the strip from the highest channel in the Preview window. Drag with Shift-RMB on the lower color strip will show only this color strip in the Preview window. This works also with sound. Shift-RMB on the sound strip will only produce the audio.
Dragging the strip handle will normally shrink or extend the strip but will not change the Preview (you keep viewing the frame at the playhead). With the option Preview during Transform of the Preview window set, dragging the handle will also display the frame at the position of the handle.

1.1.2.3.3. Playing
The Transport controls are located at the very bottom of the Video Editor workspace. They are part of the Timeline Editor. They could also be integrated with the Sequencer; see Video Editing Workspace.

Figure 5: Transport controls
These controls are probably self-explanatory. Pressing the Play/Reversed Play button will start playing the movie from the playhead in forward or reversed direction. The shortcut key is Spacebar for play forward. The shortcut Shift - Ctrl - Spacebar is for reversed play.
Note
When installing Blender for the first time, you have to enter some basic choices, e.g. the function of the spacebar (in previous versions it was assigned the Help function). You can check or reset this in User Preferences > Keymap > Spacebar Action.
When the movie is playing, the Play button is replaced with a Pauze button. Pressing the spacebar also toggles between Play and Pauze.
The Jump to Keyframe buttons will only work when there are keyframes in the timeline.
Todo
Insert link to section about keyframes
The Jump to Endpoint buttons will bring the playhead to the first or last frame in the Framerange (see Project settings). The shortcut keys are: Shift Leftarrow or Shift Rightarrow.
1.1.2.3.4. Playback settings
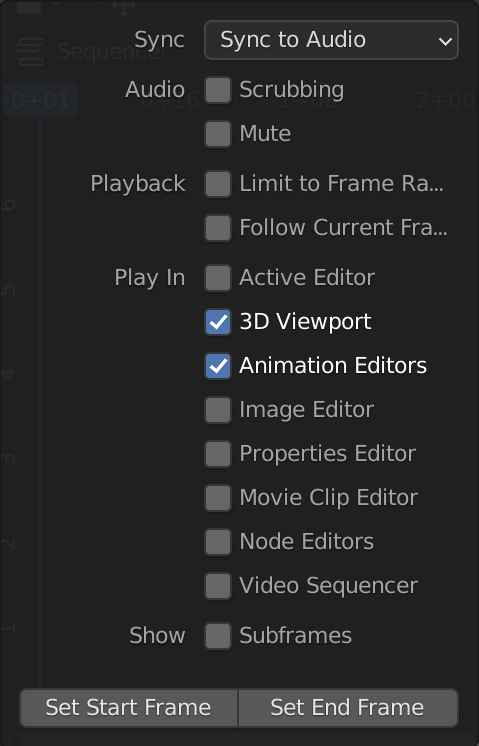
Figure 3: Playback menu
In the top left corner of the Preview window, you can find the ongoing framerate e.g. 23 fps during playback. A red number indicates that the running framerate is slower than the framerate set by the project.
- Sync
Play Every Frame: plays every frame even if playback is slow; the framerate can drop beneath the desired fps.
Frame Dropping: Drop frames if playback becomes slower than the scene’s frame rate. Under high pressure, this will become very noticeable as apparent jumps within the movie.
Sync to Audio (default): drop frames if playback becomes too slow to remain synced with audio.
- Audio
Scrubbing: scrubbing a timeline with audio strips can sometimes be annoying. The sound is distorted, due to the speed of scrubbing. You can toggle on or off the audio while scrubbing with this option.
Mute: with this option, you can mute the sound of all sound strips.
- Playback
Limit to Frame Range: don’t allow selecting frames outside of the playback range using the mouse.
Follow Current Frame: during playback, the playhead moves across the timeline. In figure 2, the Frame Range (e.g. 1 - 1580) lies completely within the timeline window. However, most of the time, this is not the case. But what if the frame range is larger than the timeline window? What will happen if the Playhead reaches the border of the timeline window? If Follow Current Frame is disabled, the playhead runs off the screen. If enabled, the timeline window will be panned and show the next range of frames of the same width.
- Play In
When you pressed the Play button, you see the movie playing in the preview window. If all options are disabled, then the preview window will not be updated. So, at least the checkbox Animation Editors (updates the Timeline, Dope Sheet, Graph Editor, Video Sequencer) or Video Sequencer must be enabled to preview the movie.
1.1.2.4. Using markers
With a long timeline, it could be useful to insert some markers. Markers are used to name specific frames with a meaningful name. They are shown as small white triangles at the bottom of the Sequencer timeline. In figure 2, the second marker (Appearance dog) is selected. You can see by the white fill-color of the triangle, the slightly elevated text and the white dotted vertical line. The other markers are not selected (only a grey outline and a black dotted line). The first marker (F_01) is the result of the menu Marker > Add Marker (M). This marker is added at the location of the playhead and has a standard name F_XXX, where XXX is the framenumber. The text is slightly elevated as indication that the playhead is at the marker location. In order to get more meaningful names, you have to rename (Marker > Rename Marker of Ctrl M shortcut).

Figure 2: Markers in the Sequencer timeline
More detailed information is in Animation & Rigging > Markers. To summarize the most important commands for the Video Sequencer:
The display of markers in the timeline can be toggled on or off with the menu View > Show Markers.
Add a marker: select the frame and press M. You can also add markers during playback while viewing the movie. Just press M when the playhead is at the desired frame. The markers have a name like F_514 (frame 514).
Select a marker: LMM - Click on marker triangle. To select all markers, press A when over the marker timeline. To select multiple markers, press LMB and drag over the markers.
Rename a marker: select marker and press Ctrl + M.
Move marker: select marker and press G. Move the markers and LMB + Click to confirm or RMB + Click to cancel.
Delete marker: select marker and press X.